


Sharing with you today a comprehensive tutorial on How to Make Choux Pastry. It's a French pastry classic that provides the foundation for many delicious and irresistible desserts such as crisp buns or éclairs. Follow my guide packed full of step-by-step photos, tips & tricks and troubleshooting so you can master it at home too.

I'm so excited to deep dive into this culinary school staple. Over the course of the rest of the year, we're gradually going to develop our skills using this dough to make a myriad of desserts. From simple chouquettes to profiteroles, to éclairs and then to churros and beignets, we'll tackle them all.
Choux pastry gets a bad rap for being tricky and troublesome that only a highly trained pastry chef can succeed at. Undeservedly so. I'm here today to debunk that myth. Yes, it forms the building block for many a pastry chef and because of this you instantly assume it has a complex technique. In fact, it's simpler than you think and should be at the cornerstone of your baking techniques.
Once you learn the little nuances that I'm going to teach you today, you'll fall in love with this versatile, fool-proof choux pastry recipe. Grab a cuppa, take a seat, there's a fair bit of information for you in this post.
Jump to:
If you love deep diving into How-To Guides, then you'll love my How to Make Sweet Short Crust Pastry, How To Make Enriched Dough, How to Make Crêpes and more. Each one is super educational to maximise your success.

❓ What is Choux Pastry?
Exactly what is Choux Pastry though? Referred to as Pâte à Choux and pronounced 'pat a shoe', it's a pastry that originates in France and translates as 'cabbage pastry'! The cabbage part refers to the shape the choux pastry puffs up to once baked, but thankfully bears no relation to the taste!
Made up of only 7 basic pantry ingredients its uniqueness comes from the method of twice baking. The flour, butter, water, milk, sugar and salt are cooked on the stovetop, before being cooled and a stream of whisked eggs added in. Slightly thicker than a batter, but not as thick as a traditional dough, the result is a smooth, shiny dough that can hold its shape once piped.
Its second bake in the oven causes the dough to puff up and set in shape, creating a golden crisp exterior shell and tender, soft, hollow interior. Due to the eggs and butter, it tastes buttery and rich making it the perfect vessel to fill with creams, curds, pastry cream, sauces or even ice cream.
What Can You Make With Choux Pastry?
The versatility of choux pastry is what I love the most and it forms the basis of so many well-known choux pastry desserts.
It can be baked in various shapes and filled to make:
- Simple Chouquettes - the simplest use for choux pastry. Pastry shells are topped with pearl sugar and dusted in icing sugar for added sweetness.
- Profiteroles - choux buns filled with vanilla pastry cream, whipped cream or ice cream and drizzled in chocolate ganache.
- Cream Puffs - choux buns filled with sweetened whipped cream or pastry cream.
- Choux au Craqueline - a choux pastry baked with a covering from a cookie disc. The disc adds a beautiful textural crunch to the crisp choux bun.
- Éclairs - one of the most iconic French pastries, elongated choux pastry buns are filled with pastry cream and topped with a flavoured icing.
- Gougères - simple choux pastry dough with cheese of your preference added to the dough before piping and baking into cheese choux balls.
- Paris Brest - a more elaborate pastry of a baked wheel of choux pastry traditionally filled with praline flavoured cream.
- Gâteau St Honouré - popular in a Parisienne Patisserie, this is a beautiful, elaborate cake consisting of puff pastry layers, pastry cream and bite-sized choux balls.
- Parisienne Gnocchi - a different but simple savoury use for choux pastry. It's piped into small balls into boiling water and poached before frying with a sauce and herbs.
- Croquembouche - An elaborate wedding classic, it's a tower of choux pastry puffs held together by crunchy caramel.
Or it can be fried to make:
- Crullers - these are a ring of choux pastry fried until crisp on the outside and with a light and airy interior.
- Churros - fried lengths of choux pastry dusted in sugar and dipped in a chocolate sauce.
- Beignets - a deep-fried choux pastry liberally dusted in icing sugar- it's like biting into a crispy, sweet cloud!
Wow, this list is quite a lineup of pastries that you'll know and love and others you've only seen on GBBO! I mean, the possibilities with this one basic dough are endless!
🌟 Why You'll Love This Recipe
- Uses basic pantry staples. I mean, I'm sure you'd have all the ingredients you need right away.
- It's less complicated to make than you think. With some visual clues and my tips, you'll see that choux pastry is the least bit intimidating to make.
- Can be made within an hour and a half. The choux pastry itself can be made, piped and popped into the oven in under 20 minutes.
- It's the starting point to a bevvy of incredible, beautiful, professional-looking desserts. You're sure to impress when making anything with choux pastry.
- Make it sweet or savoury. This is one versatile dough. Along with all the sweet recipes you can make, omit the sugar and add cheese to make gougères (cheese puffs) or herbs to make Parisienne gnocchi.
- Perfect for any occasion. Choux Pastry can be used for desserts or canapés for afternoon tea, birthday parties, Mother's Day, Eastertime, or Christmas. Let's be honest, at any time, really!
🧾 Ingredients Needed
Can you believe that there are only seven ingredients in this choux bun recipe?! And one of those is water, so does that even count? I've written some important notes below regarding the ingredients. They are definitely worth a read as each ingredient plays a vital part in the success of the choux recipe.

- Liquid: water or milk - Use either water or milk or a combination of both. I use milk and water in my recipe today as they yield crisp shells with a tender custard-like interior. You get to choose, but what's important is that you stick with the correct quantity and don't deviate from this.
- Butter - Provides richness and flavour to the dough, but also moisture. I prefer to use unsalted butter (preferably European butter) to control the amount of salt added later. If using salted butter, then omit the extra salt in the recipe.
- Flour - Adds structure to the dough. I've only tested with plain (all-purpose) flour but have researched that cake flour can produce a slightly softer texture and bread flour, which is high in protein, produces a sturdier pastry shell. Weigh your flour with digital scales to obtain the most accurate weight. There's no room for guesswork in such a recipe.
- Eggs - Adding just the right amount of eggs helps create a flexible and structured dough when baked. Too much and the dough will be too runny and result in flat choux balls; not enough, and the dough will be too dry and crack. The eggs also provide the essential leavening needed to puff the dough. Room temperature eggs are also key.
- Sugar and salt - You can make choux pastry perfectly well without sugar or salt, but for me, they add flavour and season the dough. Sugar adds sweetness but also helps colour the dough. The salt enhances the sweetness whilst also balancing it out.
👩🏻🍳 How to Make
*Be sure to see the recipe card below for the full ingredients list & instructions!*
The process of making choux pastry is actually quite quick and can be done in about 15 minutes. It comes together in 4 simple steps.
- Heat the water and butter until it boils.
- Add in the flour and cook it to form what the French call a 'panade', then cook the 'panade' for a couple of minutes.
- Cool the panade.
- Beat in eggs until the dough is smooth.
The combination of cooking the panade so that the starch in the flour hydrates and gelatinizes, and then the steam emitted from the water and eggs in the dough is the catalyst to cause the dough to rise and puff. If you want to read more about the science behind choux pastry, then Serious Eats has an interesting article that's worth a read.
When making choux pastry, we rely on visual cues and the feel of the dough to know it has reached the right consistency. I’ve included plenty of images to guide you through this process. So as not to overwhelm you with a barrage of tips in one go, I've dotted them throughout, as and when they are applicable.
Make the Panade
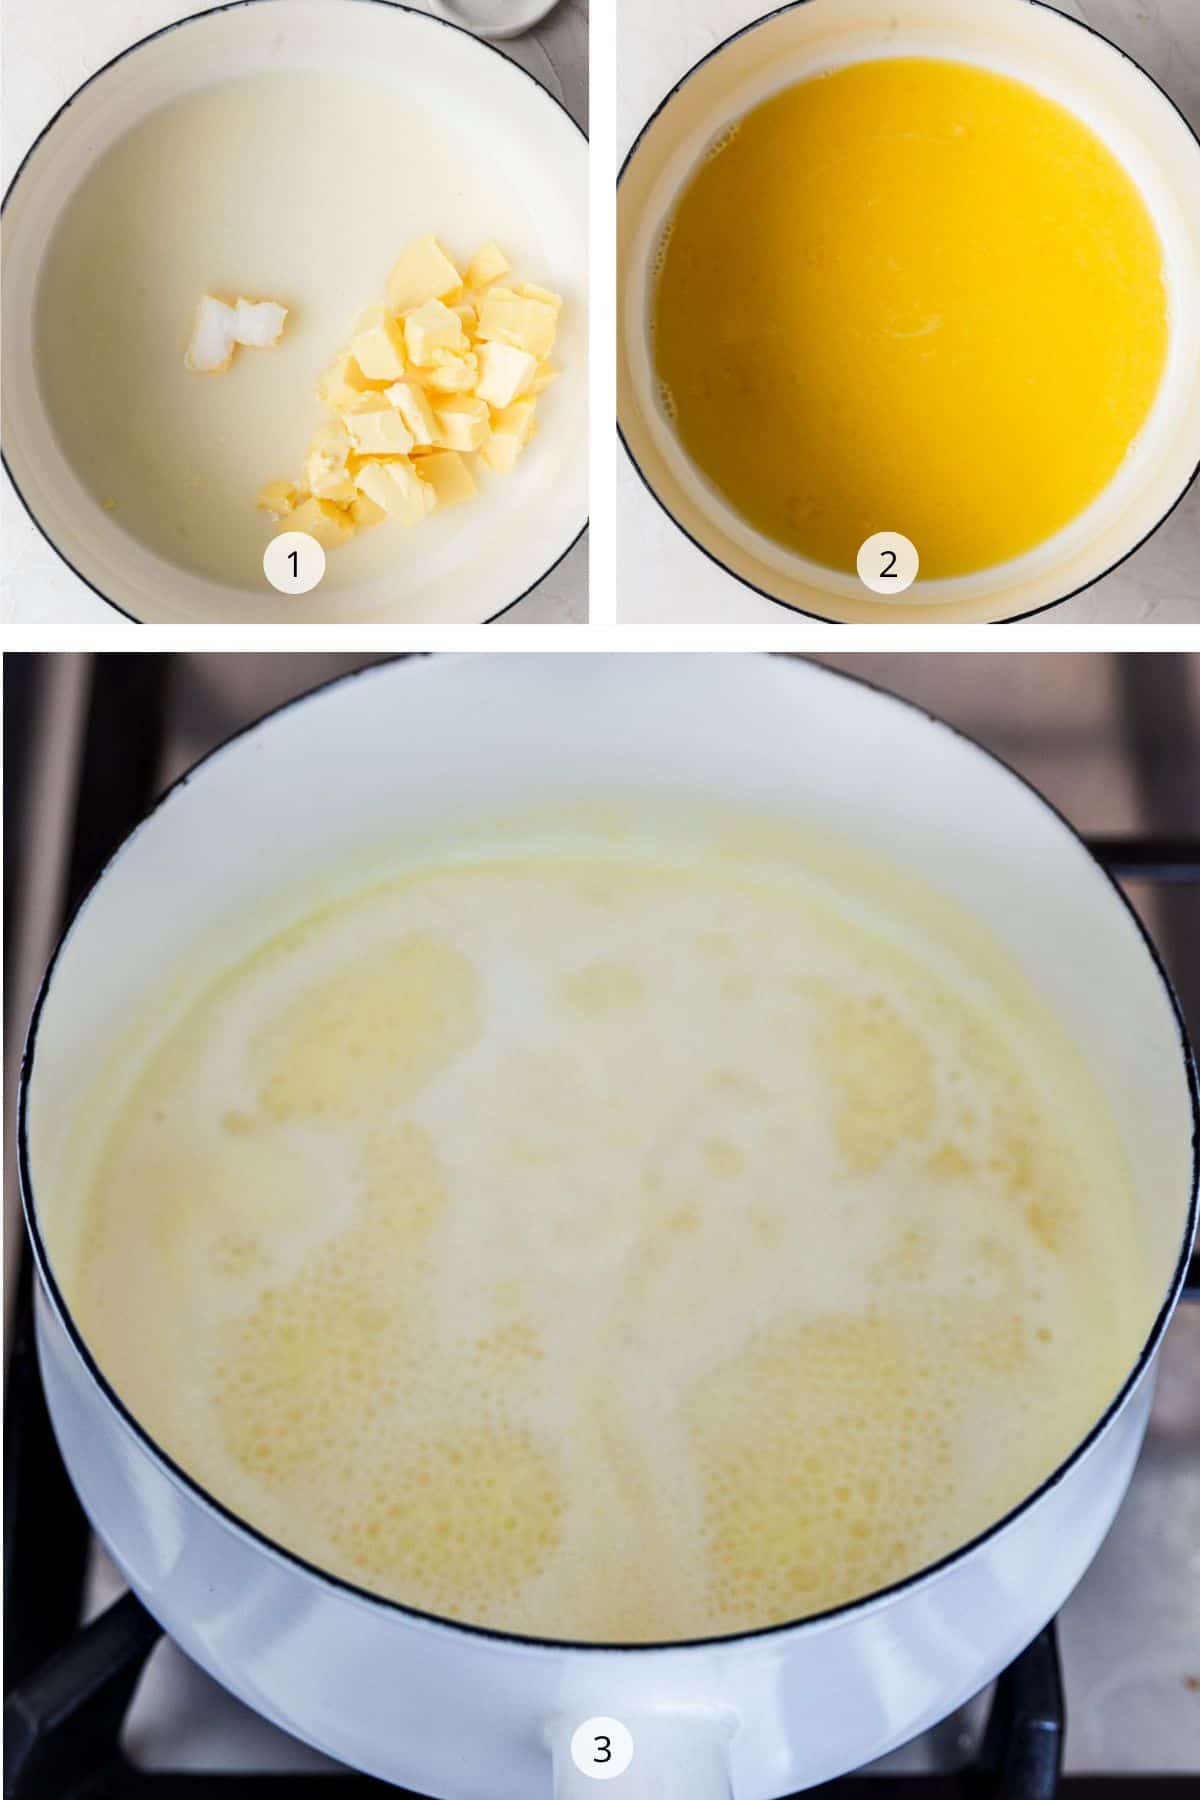
STEP 1. Melt the butter and bring the liquid to a boil. In a saucepan, add the water, butter, sugar, and salt and heat on low to dissolve the sugar and melt the butter (Images 1 & 2). Turn up the heat to medium-high until the liquid is at a rolling boil (Image 3).
TIP: Cut the butter into small pieces.
The aim is for the butter to have melted fully before the water comes to a boil. Cutting the butter into small cubes before adding it to the saucepan helps it melt quicker.

STEP 2. Add flour. Immediately take the pan off the heat, then add the flour in one go into the saucepan and mix together vigorously with a wooden spoon (Images 4 & 5)
Return to medium-high heat and beat the mixture for 2 minutes. Press and spread the dough with the spoon to flatten it and increase the surface area to speed up the evaporation of excess moisture. Beat until a ball forms and a thin starchy film forms on the bottom of the pan (Image 6).
TIP: Correct temperature.
If you have an instant-read digital thermometer on hand then the panade temperature should be anywhere between 75°C to 80°C (165°F and 175°F).(Image 7)
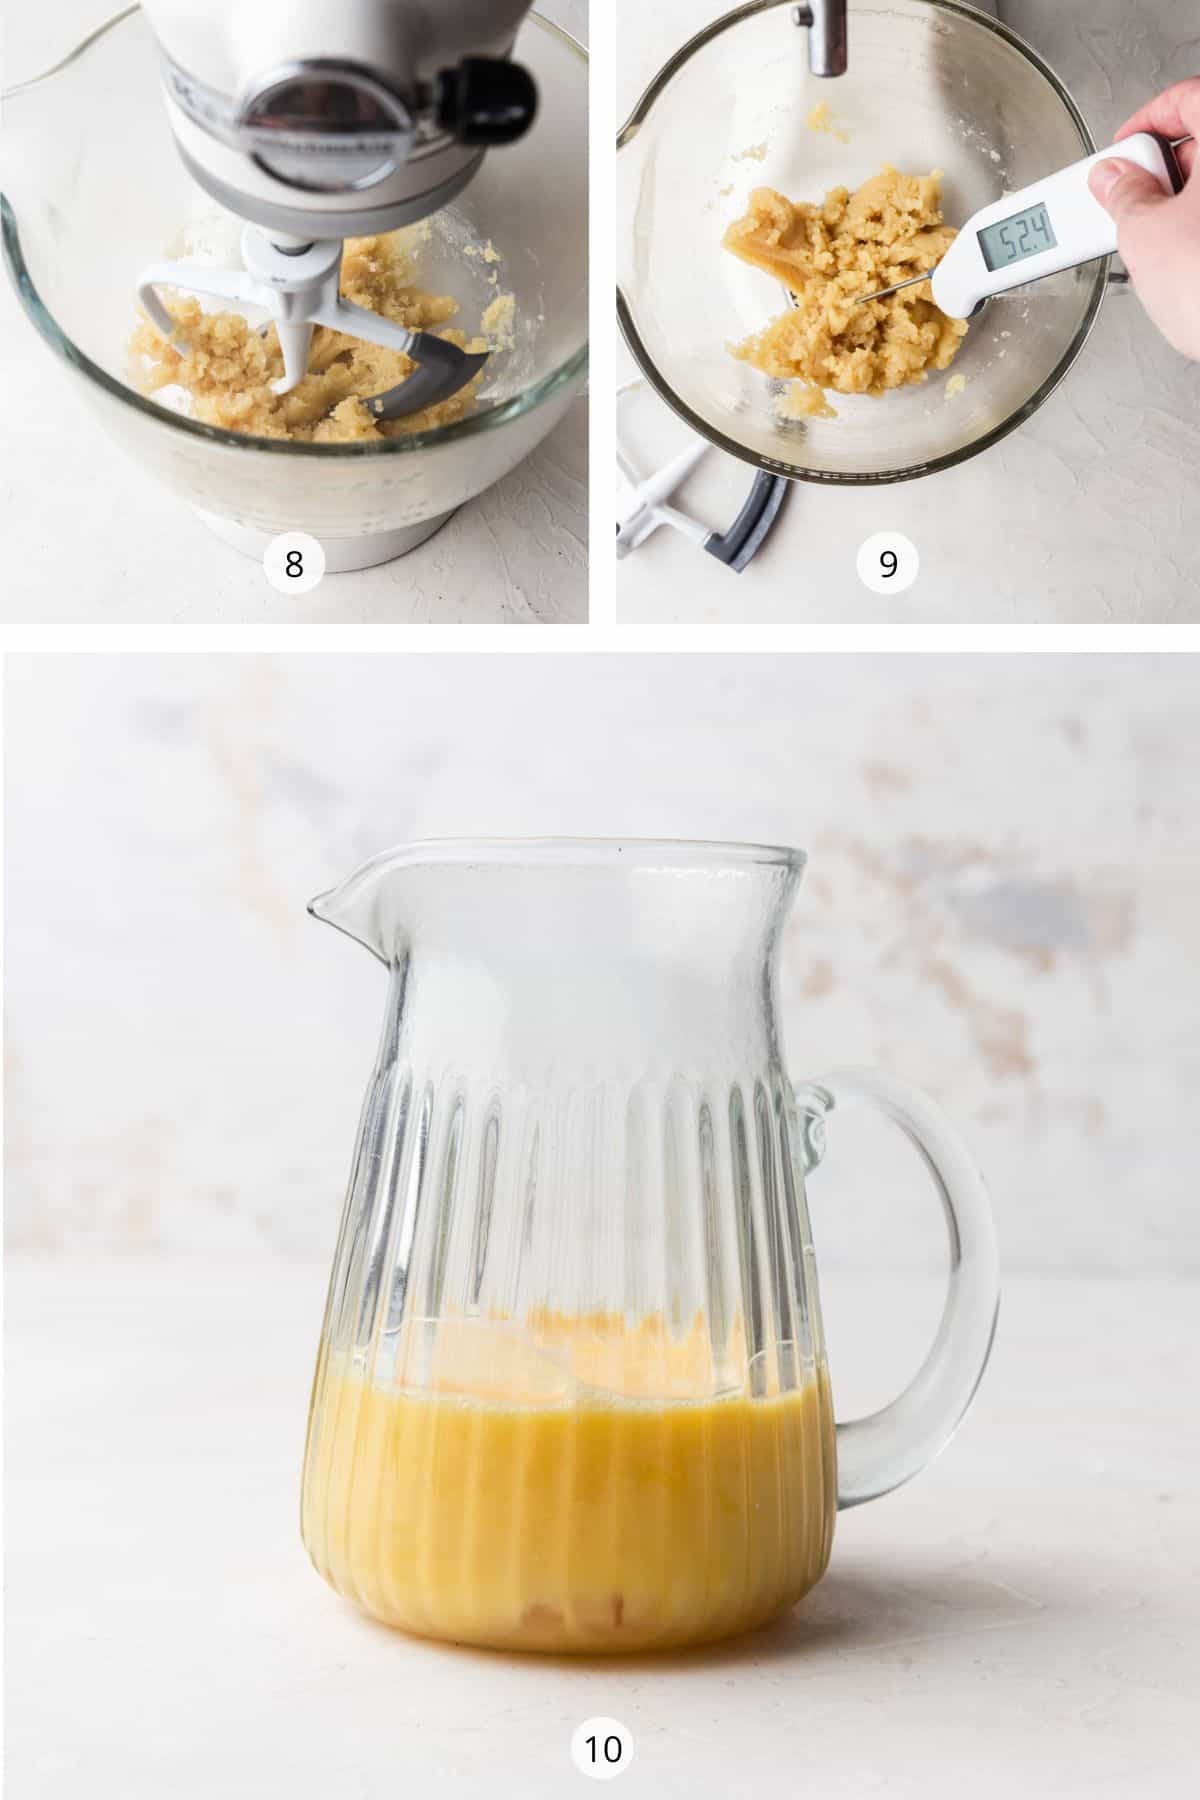
STEP 3. Beat to release the steam. Add the mixture from the saucepan into the bowl of a stand mixer fitted with the paddle attachment. Beat for 1-minute on low or until you don’t see any more steam coming out of the bowl. Don't beat it for too long or on high as it can cause the fat to separate from the butter - this can lead to cracks in the baked pastry shell (Image 8).
TIP: Why do you have to cool the panade?
The panade needs to cool enough, so they don't cook and scramble when the eggs are added. If using an instant-read digital thermometer, then the temperature of the panade needs to reduce to 60°C (140°F) or under. (Image 9)
Whisk the eggs in a jug or bowl (Image 10). I like to whisk them in a jug as this allows you to control how much egg is poured into the panade in the next step. The dough may not need it all.
Add the Eggs

STEP 4. Beat in eggs. With the mixer running on low speed, slowly pour in ¾ of the whisked eggs in 3 to 4 separate additions, mixing for 30 seconds between each addition (Image 11). Add the eggs in too quickly, and you'll end up with runny eggs and bits of panade floating around!
It’ll look curdled and slimy (Image 12) but keep mixing and it will come together. See images 13 & 14, so that you can visually see the process the dough goes through as you incorporate the eggs.
TIP: Don't add all the eggs at once.
Add them in gradually. I suggest adding up to ¾ of 4 whisked eggs and then beating the pastry for up to two minutes to see how the mixture comes together. You can always add in a bit more egg.

The consistency. This is one of those doughs where you must rely on visual cues to know when it's ready. There are a couple of telltale signs.
- When perfect, the dough is smooth and thick in texture and shiny in appearance (Image 15).
- When the beaters are lifted out, the dough should reluctantly fall off, creating a V shape (Image 16).
- It needs to be thick enough to hold its shape when piped. Test this by running a finger through the dough - if the pass remains, it's a perfect consistency (Image 17).
TIP: What if the batter isn't smooth enough?
Add a little more of the whisked egg. I have listed the 5th egg in the ingredients list, so you can use a bit of this extra egg if you need to.
The following factors all contribute to why the amount of egg varies.
- How much moisture was cooked out of the panade at the start?
- Different sized eggs. I work off 1 large egg weighing 58 grams.
- The type of flour that you use will affect the hydration. Bread flour needs more egg, and cake flour needs less.
Set aside any remaining egg for egg wash later.
Chill, Pipe and Bake
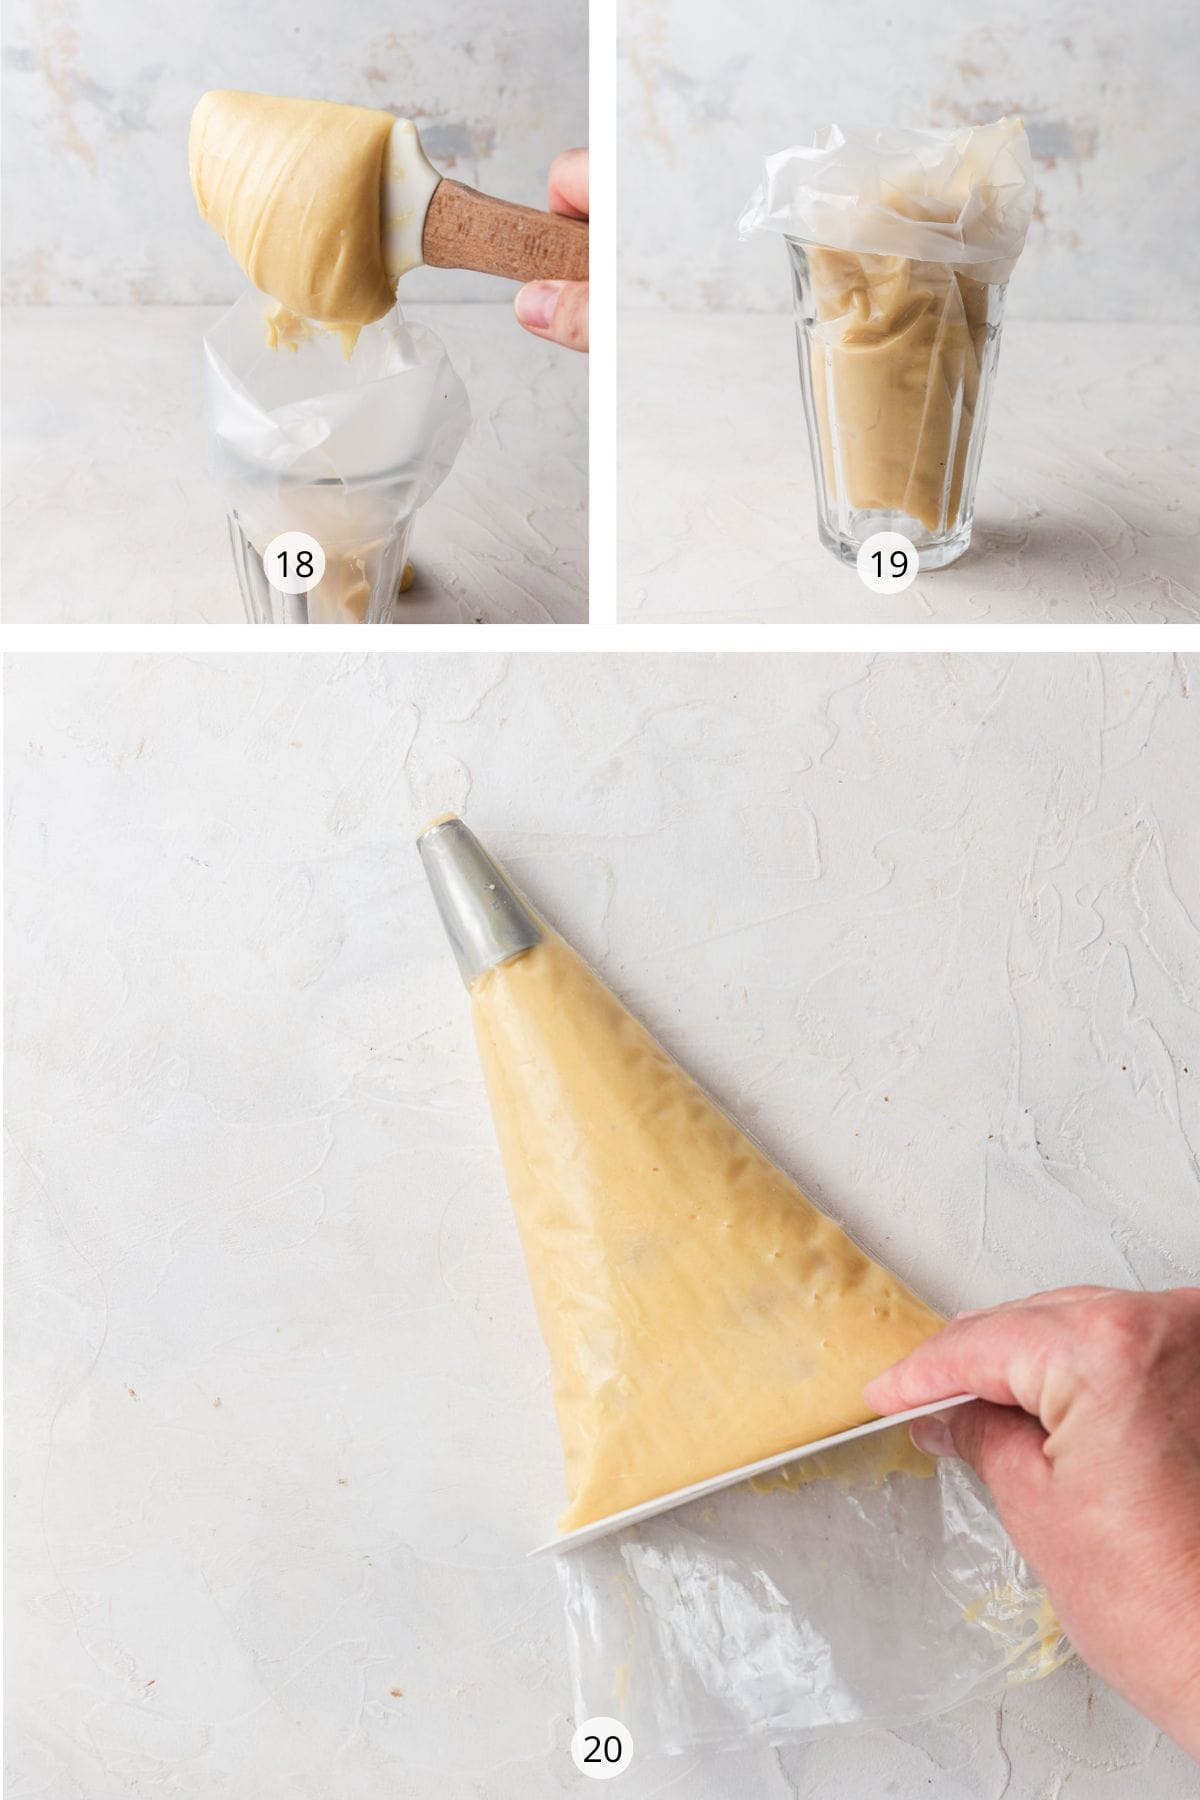
STEP 5. Fill the piping bag and refrigerate. See the images above for an easy way to fill your piping bag.
- Fit 1.3cm (½ inch) plain nozzle or Wilton 1A piping tip into the bag, then fold the tip up and pop the piping bag into a glass (Image 18). The top of the bag will overhang, which is not a problem.
- Scoop the choux batter into the bag until full (Image 19).
- Then place the bag on a work surface and use a pastry scraper to push the batter into the tip (Image 20).
And there you have an easy, relatively mess-free way of filling your piping bag! This tip can be used for any fillings.
Refrigerate the dough and preheat the oven to 200°C (390°F). Once the piping bag is full, twist the wide opening to seal the bag and refrigerate the dough whilst the oven comes to temperate. Once the oven is at temp, move on to the next step of piping and baking.

STEP 6. Pipe the choux dough
NOTE: For choux buns, a 1.3cm (½ inch) plain nozzle or Wilton 1A piping tip is best. But if baking éclairs use an open star piping tip.
Pipe choux pastry on a parchment paper-lined baking tray.
For choux buns, ensure you hold the piping bag vertically upright - otherwise, you’ll have wonky, odd-shaped buns! (Image 21) Pipe 1.5 inches wide mounds about 3 inches apart. The larger you pipe them, the more they'll expand. I trace the circles on parchment paper that I slide under to use as a guide. It helps get even-sized choux buns.
For éclairs, make sure you hold the bag so that the piping nozzle is at a 45-degree angle from the paper. Pipe in a 10cm /4-inch straight line in one even stroke. The grooves created by the open star tip will help prevent the choux éclair from cracking.
TIP: If you don't have a piping bag
Technically you can dollop the dough onto the baking tray, but the result will be irregular, messy-looking buns. At a pinch, it's preferable to scoop the dough into a zip lock bag and snip the corner off to pipe.
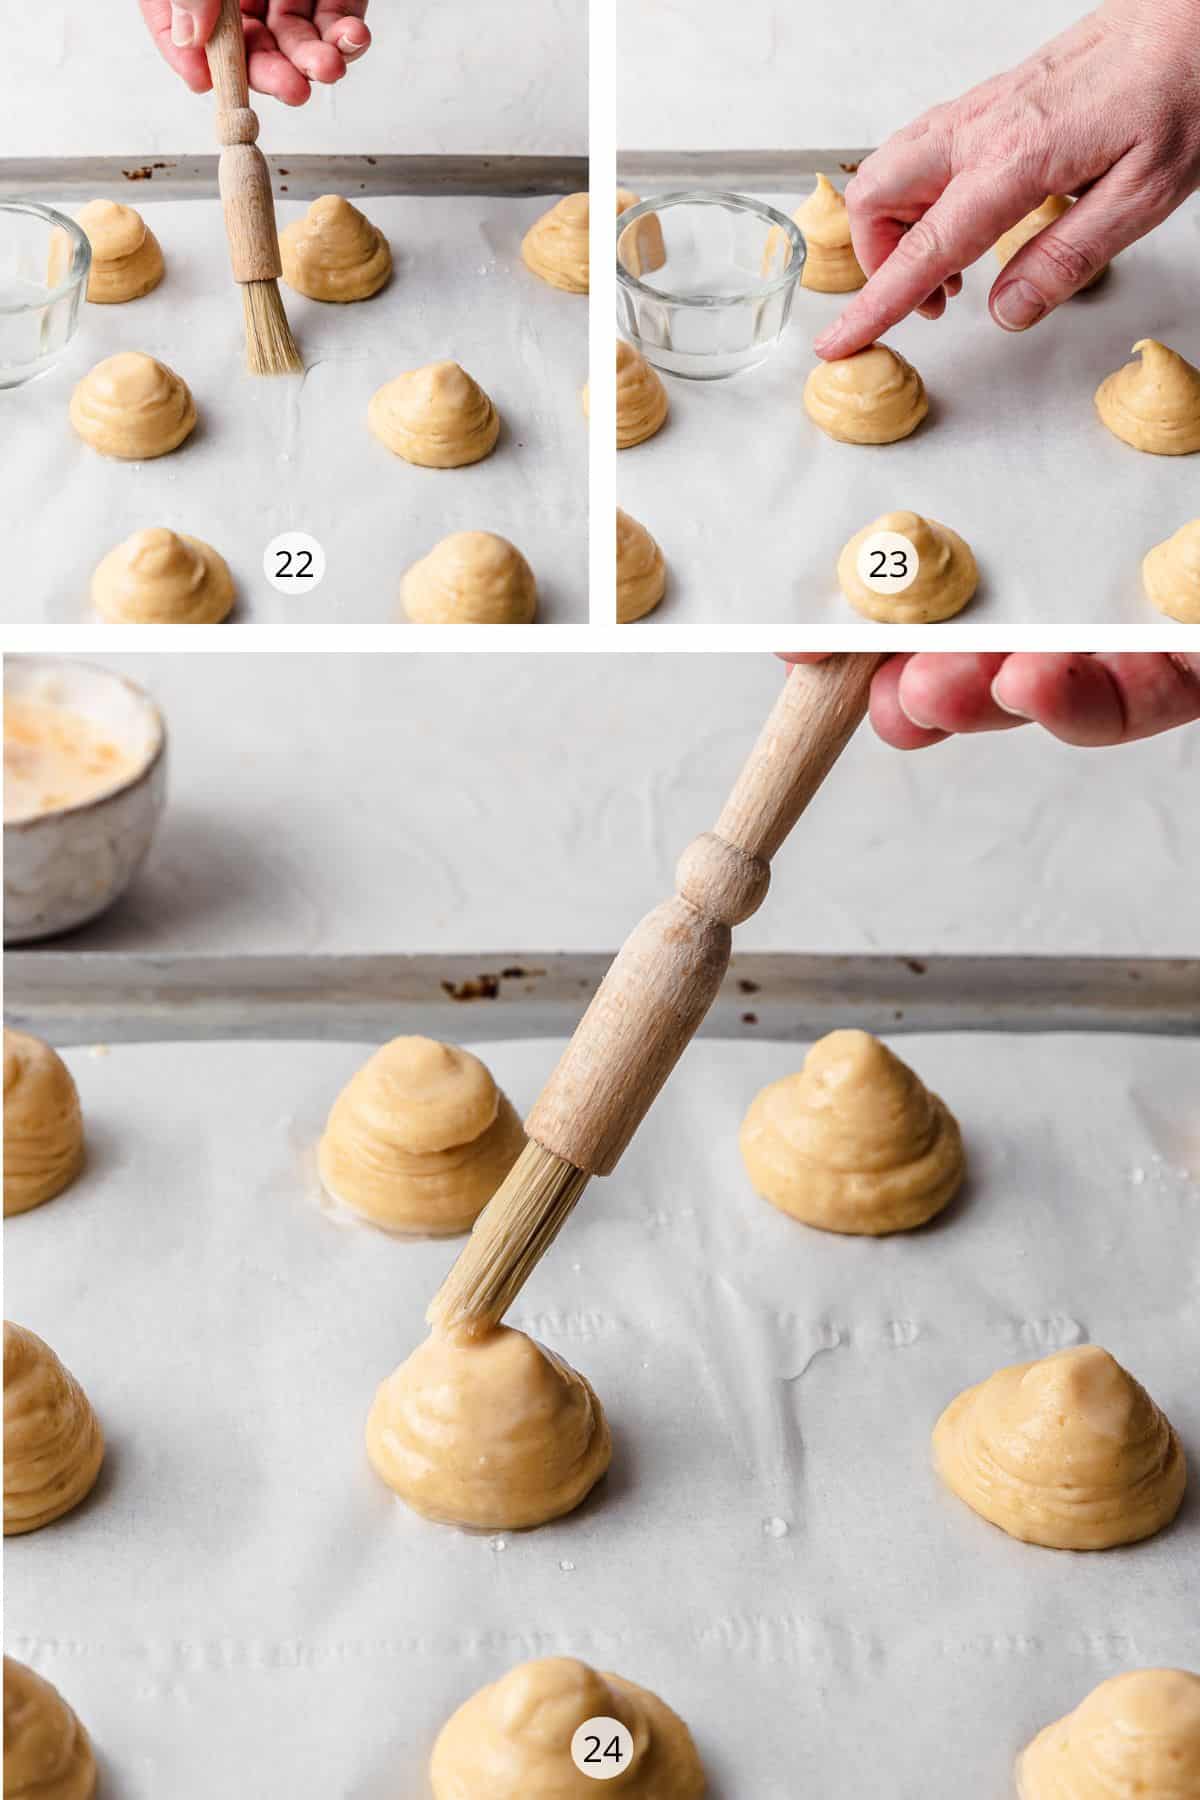
STEP 7. Prep choux on the tray. Three extra things help with the baking of your choux pastry. It can be a little laborious, but you've got this far, so it's worth going the extra mile.
- With a wet finger, smooth down the points of the choux buns or the tips of the éclairs. This will prevent them from burning in the oven (Images 22).
- Brush the parchment paper with water around the buns. This produces more steam in the oven providing extra lift for the buns to puff up (Image 23).
- With the remaining whisked egg, add the milk, mix and brush egg wash onto the buns or over the full length of the eclairs. This gives a glossy sheen to the finished pastry but also helps deepen the golden colour (Image 24).

STEP 8. Bake: The oven was preheated at 200C. When you put the buns in the oven, reduce it to 180C (350F) for 25-30 minutes or until choux buns are golden brown and crisp. Éclairs can take 5 to 10 minutes longer in the oven. Do NOT open the oven for the first 25 minutes whilst the choux are baking.
TIP: Don't open the oven while baking
Opening the oven door releases the steam from the oven. This steam, created from the water in the eggs on the parchment paper, puffs the dough up. If that steam is released before the oven's heat has had a chance to set and crisp up the pastry shells, then the shells will deflate.
With a skewer, make holes in the bottom of each shell (Image 15) then return the tray to the oven to bake for an extra 5 minutes. (Image 16) Afterwards, take the shells out of the oven and leave them to cool on the trays.
TIP: By making the holes in the pastry shells, you are allowing the steam and heat to release from within the bun cavity. The extra five minutes in the oven allows the shell to further crisp and dries out the inside.

💭 Recipe Pro Tips
- Weigh your ingredients accurately. Use a digital scale for an accurate measurement. This is imperative for this type of recipe.
- Use a stand mixer. As much as the dough can be made by hand, using a standmixer makes light work of the process.
- Add eggs in gradually. Everyone will use a slightly different amount of eggs due to the factors I’ve listed in the post. Adding the eggs in bit by bit will keep you in control of the dough's consistency. Just remember: Too little egg = you can add more. Too much egg = it's a palava to fix.
- Know your oven: Ideally, use an oven thermometer to accurately bake at the correct temperature. Unfortunately, each oven varies wildly.
- Don't open the oven. The moisture in the dough and the water droplets on the parchment paper aid in inflating the dough, and the oven's heat then sets it in place, creating the puffed-up balls. If you let the steam out of the oven too early, you’ll have flat buns.

🥣 Choux Pastry Fillings
Alrighty, this is the fun part. What to do with your choux pastry shells once you've baked them? The options for filling and drizzles are endless. Here are some of my favourites:
- Sweetened whipped cream (créme chantilly): whipped cream sweetened with powdered sugar and vanilla makes a light and airy filling. I used a coffee-flavoured créme chantilly in my Mocha Christmas Profiteroles Wreath and it was delicious!!
- Créme pâtissiere (pastry cream): A French chilled custard filling that can be flavoured with vanilla, coffee, chocolate, or fruit, such as raspberry, strawberry or caramel. I also flavoured my pastry cream with maple syrup for these Maple Syrup Éclairs for a flavour hit which was incredible.
- Crème Légère: classic Crème Pâtissière (French Pastry Cream) and whipped cream folded together.
- Créme diplomat: A base of créme pâtissiere is folded with whipped cream to lighten it up but gelatin is added to create more stability. Like pastry cream, it can be flavoured.
- Jams or curds: Fill the choux buns with any of your favourite curds or jams such as lemon curd, blackberry jam or pear compote. Make your very own cream puffs. Cut the pastry shell in two, spoon jam into the base and pipe whipped cream over the top, cover with the top of the choux bun and serve. You can see my version of a Cherry Cream Puff.
- Ice cream: Slice the choux buns in two and scoop your favourite ice cream into the middle, . Drizzle with some Hot Fudge Sauce and you have an incredible dessert!!
📋 FAQs & Trouble Shooting
Yes! You can make the dough and refrigerate it for up to two hours before piping and baking. Make sure it's well sealed in a pastry bag. Or store it in an airtight container with the surface covered with plastic wrap so that it doesn't form a skin.
Cause for runny dough: Too much egg added into your panade.
The Fix: Make another batch of panade, heating the butter, water, sugar and salt and then adding in the flour and cooking it. At this point, let it cool to room temperature.
Then add this new panade, spoonful by spoonful, into the runny choux pastry, and mix until you have the right consistency. It works like a charm.
TIP: My biggest tip here is NOT to add only flour into the runny choux pastry with the best intentions to thicken up the dough. It's uncooked and will ruin the pastry - you'll have to start again if you do this.
Cause for soft/flat buns: Too much egg may have been added into the dough, making it too runny. Or the oven door was opened too soon during baking, or the pastry shells were not baked for long enough
The Fix: Monitor the amount of egg added to the panade more carefully. Don't open the oven door for the first 25 minutes of baking.
Cause for deflated buns: Not enough moisture was cooked out of the panade in the first step. The dough was too runny before piping and baking. The oven door was opened during baking, letting out the much-needed steam. The pastry wasn't baked for long enough to allow the puffed dough to set.
The Fix: Cook the panade on the stovetop for a little longer and monitor the amount of egg added to the panade more carefully. Check your oven temperature is accurate, don't open the oven door for the first 25 minutes of baking and check your baking time.
Cause for cracked choux buns:
1. There isn't enough moisture in the dough, either by cooking out the water too much in the panade or by not adding enough egg into the panade. The finished dough would not have been smooth, thick and shiny before piping.
2. The choux pastry was baked for too long, or the oven was too high a temperature, causing the shells to dry out.
The Fix:
1. When making the recipe again, watch out for the textural and visual clues for perfect choux dough. Remember, it has to drop off a spatula in a V and have a sheen.
2. I suggest testing your oven temperature with an oven thermometer. Each oven runs differently and has various hotspots throughout. You may have to tweak the temperature slightly according to your findings.
I've written the recipe using plain (all-purpose) flour as it's the most accessible flour globally and one that most will have in their pantry.
That said, choux pastry can also be made with bread or cake flour.
Bread flour has a higher protein and gluten content, resulting in a sturdier pastry shell. This is great when making éclairs as they have elongated pastry shells that can hold a fair bit of filling.
Cake flour, on the other hand, has a lower protein and gluten content and so produces more tender pastry once baked. Smaller choux shells used for chouquettes or gougeres could benefit from cake flour.
Absolutely. When it comes to cooling the panade, tip it into a large shallow bowl and spread it out over the surface area. This will help cool it down quickly.
Once cooled, add the panade back into the saucepan, which will also have cooled down. Beat the eggs into the panade with a wooden spoon. It's a bit of an arm workout but doable.
I prefer to apply egg wash to produce a lovely golden sheen on the outside of the pastry shell. You can see in the image below that the pastry shell on the right looks dull and flat without it. If covering the shells in a chocolate ganache, for example, then you may not feel the need to egg wash them.
❄️ Storage and Freezer Instructions
To store: Store unfilled choux pastry shells in an airtight container for up to 2 days at room temperature or in the refrigerator for up to 5 days. Re-crisp the shells in a hot oven for 5 minutes.
If the shells are filled, they are best eaten within a couple of hours, stored in an airtight container, and refrigerated for up to 2 days. Please note, though, that the choux pastry will soften.
To freeze: Unfilled choux pastry shells can be frozen in a freezer-safe container for up to 2 months. Thaw in the refrigerator overnight and re-crisp in a hot oven for 5 minutes.
Goodness- if you've made it this far then I applaud you!! This has been an epic post. But I truly believe that once you understand all the ins and outs of this dough, it will open up a treasure chest of choux pastry recipes going forward. I hope I've left no stone unturned and can't wait to see your creations.
🇫🇷 More French Pastry Recipes


If you tried this Foolproof Choux Pastry Recipe or any other recipe on my website, please please leave a 🌟 star rating and let me know how you go in the 📝 comments below. I love hearing from you!
📖 Recipe

Choux Pastry Recipe
Equipment
Ingredients
Choux pastry
- 120 ml water
- 120 ml whole milk
- 120 g unsalted butter, cubed into small pieces
- 15 g granulated sugar
- ½ teaspoon fine salt
- 130 g plain flour (all-purpose), sifted
- 220 g large eggs (4 eggs, but have 1 extra on hand), 4 to 5 eggs
- 1 teaspoon whole milk, for egg wash
Instructions
Make the panade
- Melt butter and heat water and milk. In a medium saucepan, add the water, milk, butter, sugar and salt, and heat on low until the butter is melted and the sugar has dissolved. Increase the heat to medium to high and bring to a rolling boil.
- Add flour. Remove the pan from the heat and add the flour immediately. With a wooden spoon, mix together vigorously until completely combined.Then return to medium-high heat and beat for 2 minutes until the mixture comes away from the sides of the pan and forms a ball. You’ll see a film form on the base of your saucepan, and you’ll know it’s ready. (Use a digital thermometer for accuracy- the panade should be between 75°C to 80°C (165°F and 175°F)
- Beat to release steam. Remove the pan from the heat and place it in the bowl of a stand mixer fitted with the paddle attachment. Beat for 1 minute on low speed to release some steam. Use a digital thermometer for accuracy- the panade should get to 60°C (140°F) or under before continuing on with the next step.In a small jug, whisk the four eggs together.
Add the eggs to make the choux dough
- Please read this step before continuing as the amount of egg added can vary.With the mixer running on low speed, slowly pour in ¾ of the whisked eggs in 3 to 4 separate additions, mixing for 30 seconds between each addition. Scrape the sides and base of the bowl halfway through. It may look curdled and slimy to start with but will come together as you beat the mixture. Once the eggs have been fully incorporated, beat the mixture for a further 2 minutes.Note on the perfect consistency. The choux pastry should be smooth and shiny and should hold its shape when a finger is passed through the mixture. Another sign that the batter is ready is when the beater or a rubber spatula is pulled up out of the batter and a thick V-shaped ribbon forms, of smooth dropping consistency. If your pastry has not achieved this consistency, add the remaining egg a teaspoon at a time and test the consistency again. If you need more egg, then whisk the 5th egg in a small bowl, and add a tiny bit at a time. Stop adding the egg as soon as you get the right consistency. I doubt that you'll need all this egg. Set aside any remaining egg to be used as egg wash.
Chill, pipe and bake
- Chill the dough. Preheat the oven to 200°C (390°F). Fill a piping bag fitted with a round piping tip and close the open end of the piping bag and refrigerate for 30 minutes Preheat the oven to 200°C (390°F).Pipe choux onto the baking tray. Line a large baking tray with parchment paper. Whilst holding the piping bag upright and keeping the tip of the piping tip touching the choux pastry, pipe 4cm (1.5-inch) wide mounds onto the prepared tray. Keep them 2.5cm (1-inch) apart.
- Prep choux on the tray. Using a pastry brush dipped in water, brush the parchment paper around the mounds. The water creates steam in the oven, which helps puff up the choux.Using the tip of your finger dipped in water, smooth the points of each mound. This stops the peaks from burning in the oven. Add milk to the remaining egg and whisk together. Brush this egg wash gently over the top of the choux pastry mounds.
- Bake. Place the tray in the oven and immediately reduce it to 180°C (350°F) and bake for 25 to 30 minutes, or until golden brown and crisp. It's important that you do not open the oven door in these first 25 minutes of baking. Remove the buns from the oven and skewer a hole in the bottom of each choux bun to allow the steam to escape. Return to the oven for 5 to 10 minutes, and then allow to cool completely on the baking tray.
- Assemble. Slice in half or pipe into the centre your favourite filling.
All recipes are developed and tested in Metric grams. I strongly recommend that you bake using digital scales for a more accurate result. I have provided a conversion to US customary in the recipe but please note that I haven’t tested using this method.


Heather says
Eek- you've got me excited to make choux pastry again. It's been a while and your guide looks so comprehensive, I can't wait to follow along on your instructions. Thanks for being so thorough!
Emma says
Amazing Heather- I can't wait for you to make choux pastry and it makes me so happy to hear that this post has inspired me. Let me know how you go!
Duncan says
This is the most detailed guide I've read so far, it's practical, workable and amazing.
Emma says
Hi Duncan- wow - what a review to receive- I'm so happy that you appreciate it - my main goal is to provide value.
Kim says
What a helpful and thorough guide, thank you! I made choux for the first time yesterday - I still need to practice my piping skills for eclairs, but the puffs were perfect.
Emma says
Hi Kim- thank you so much for the wonderful feedback- piping does take practice- that's why choux buns are great - same taste as an eclair- just different shape!!