


Want a show-stopping dessert this Holiday Season? Then my festive Christmas Pavlova Wreath is your answer. Simple to make, the crisp meringue, cream and fresh berries will make everyone happy!
Having lived in Sydney for 15 years, I fell in love with the quintessentially Australian dessert, pavlova. I've taken the classic pavlova and blown some festive dust over it to create this Christmassy Holiday Pavlova for you this year!
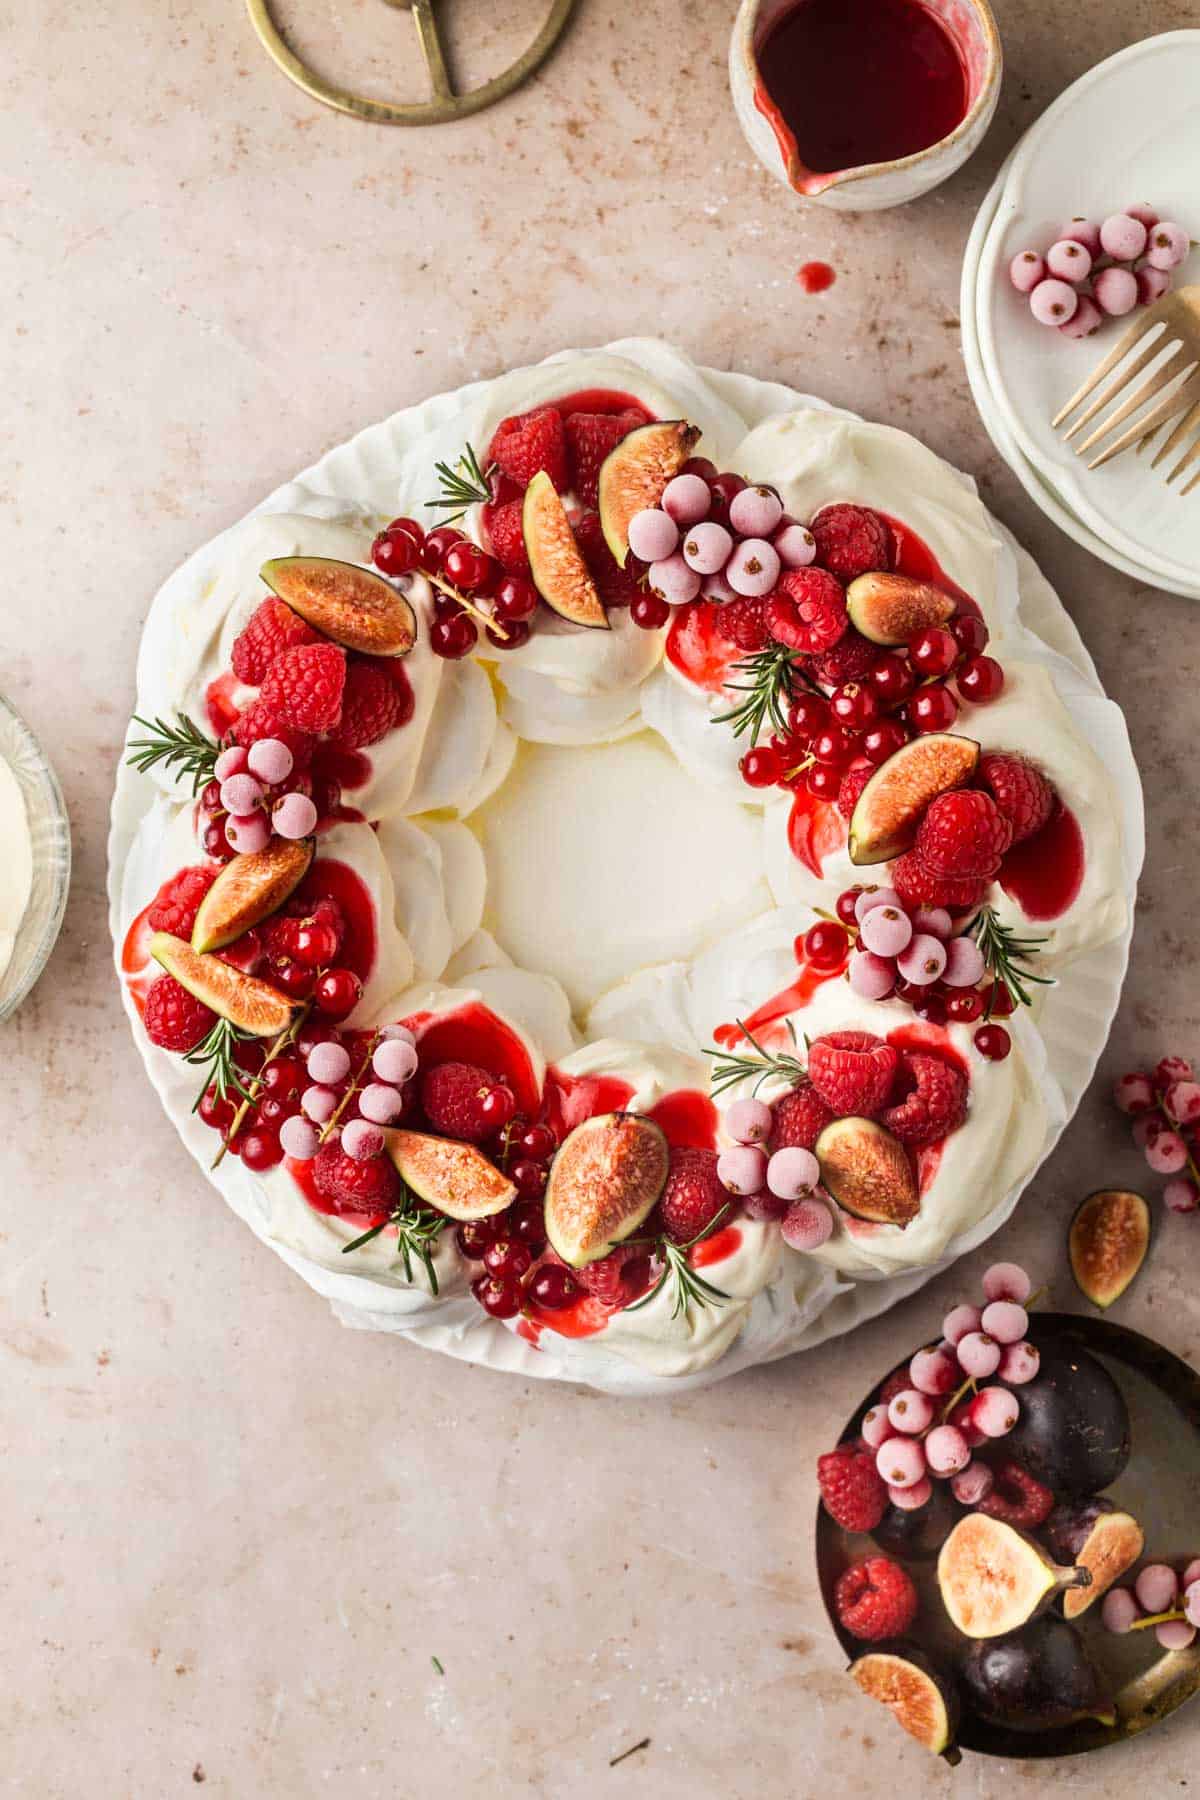
I've shaped the crisp meringue into a wreath to embody the Christmas spirit. It's then topped with sweetened whipped cream, a little raspberry coulis and some fresh seasonal fruit like raspberries, red currants and figs.
This Christmas Pavlova is almost ... almost ... looks too pretty to eat! Trust me, though, it's a crowd-pleasing dessert that you'll want to dive into straight. Check out my Gingerbread Swiss Roll Cake and Chocolate Mocha Profiteroles Wreath for more Christmas dessert inspiration.
Jump to:

❓ What is Pavlova?
Originating in the 1920's, Pavlova is a meringue dessert named after a famous ballerina, Anna Pavlova, who was touring Australia at the time. The meringue replicated the soft white layers of Anna's tutu! How lovely is that?!
Pavlova is made up predominantly of egg whites and sugar. Once whisked until thick and glossy, the egg whites are baked in a low-temperature oven for an extended time.
The result is a meringue with a crisp shell on the outside. The interior is soft and marshmallowy or chewy, depending on the length of time it's baked for. It's sweet and has a divine melt-in-your-mouth texture.
A Pavlova is usually topped with whipped cream and fresh fruit and often drizzled in a coulis or curd. It's light, sweet and absolutely delicious. Every year, at home, we have a version of it as our Christmas Day dessert - perfect after a big meal!
🌟 Why You'll Love This Recipe
- Uses basic ingredients. Can you believe meringue is made with only four ingredients? Along with a simple sweetened cream and some beautiful fresh fruits - it's a simple ingredient list for such a beautiful dessert!
- Showstopper. This Holiday Pavlova makes for such a beautiful, eye-catching centrepiece to your dessert table. Little do your guests know how easy it is to make! We'll keep that our secret!
- Makes for a brilliant make-ahead dessert. The meringue and whipped cream can both be made one or two days ahead of time. It only takes five minutes to assemble before serving - perfect for entertaining.
- Versatile. This Christmas Pavlova can be customised in so many ways. From flavouring the cream to adding different sauces and topping it with various fruit of nuts. It's a create-your-own-adventure type dessert.
🧾 Ingredients Needed
The ingredients list is broken into three main parts: the meringue, sweetened whipped cream and the fruit decoration. All components use standard household ingredients. The fruit can be adapted to what's in season where you live.
I've drizzled my Christmas Pavlova meringue in a raspberry coulis for something a little extra - but this is totally optional.

Meringue
- Egg Whites - I've used large eggs for the whites. A little tip - it's easier to separate the egg whites from the yolks when the eggs are cold. However, the egg whites must be at room temperature when making the meringue.
- Sugar - Superfine or caster sugar is best to use as it dissolves into egg whites quicker than regular sugar. Make your own by blitzing granulated sugar in a food processor. Just don't take it too far and turn it into icing sugar!
- Lemon Juice or White White Vinegar - You can use either when making a meringue. The egg whites just need an acidic component to help stabilise the meringue whilst baking.
- Cornstarch - The cornstarch (cornflour) also helps to bind and stabilise the liquid in the egg whites and helps prevent the liquid from seeping out.
Decoration
- Any fruit can be used to decorate the meringue. I find the tart redcurrants work really well against the sweet raspberries and figs.
- White Chocolate - an optional addition. When melted and brushed over the meringues, it helps create a barrier and prevent the cream from softening the meringue. You can use milk or dark chocolate too.
- Raspberry Coulis (optional): I made a quick and easy raspberry coulis, but you can either omit this or use a store-bought. (Notes on how to make homemade coulis in my How To section below)
📖 Variations
This is one of those recipes in which you can truly create your own special variation. The meringue and cream are the perfect blank canvas! But here are a few of my favourite variations.
- Black Forest Pavlova: Add cocoa powder to the whipped cream and then top with kirsch-soaked cherries and a sprinkle of flaked almonds.
- Raspberry Lemon Pavlova: A fresh option during the warmer months. Swirl lemon curd through the whipped cream and top with a pile of fresh raspberries.
- Triple chocolate Pavlova: Go indulgent and add a ¼ cup cocoa powder to the meringue before baking. Serve drizzled with melted chocolate. So decadent!
- Mini Pavlovas: Make them individual!! Just dollop a couple of tablespoons of meringue onto the baking trays with a little space around them and bake for 1-1.5 hours. Check out my Cranberry Mini Meringue Nests for more details.
- Strawberry Pavlova: Channel Mary Berry's Pavlova and top the meringue with freshly whipped cream and strawberries. A delightfully summery rendition.
- Roasted Fruit Pavlova: Do you love roasted fruit such as strawberries or plums? It intensifies the flavours so much. The well-rounded flavours of roasted fruit would work beautifully with the sweet meringue.
👩🏻🍳 How to Make a Christmas Pavlova
I've included lots of process shots so that you can see how to create the meringue and shape it into a meringue wreath.
Meringue can be fairly particular to make, so it's important to follow each of my steps. Once you have the know-how, you'll realise that it's actually very straightforward. Let's dive right in.
*Be sure to see the recipe card below for the full ingredients list & instructions!*
Make the Meringue

STEP 1: Prep the oven and trays. Preheat the oven to 140C (280F). When the meringue goes into the oven, the temperature is turned down immediately, and the meringue is baked for a long time.
The long bake time on low heat allows the exterior to set whilst still maintaining its white colour, and the whipped egg inside slowly cooks through to produce its marshmallowy texture. Low and slow is definitely best!
Prep a baking tray. Line the tray with parchment paper, then draw a circle on the paper approx 30cm (12-in) in diameter (Image 1). Then draw an inner circle 10cm (4 in) in diameter (Image 2). Turn over the parchment paper.
TIP: Use a large and small bowl as a guide to draw around to get exact circles. This helps with the final wreath shape.

TIP: Ensure your equipment is clean and dry
Your stand mixer bowl and whisk must be clean, grease-free and totally dry before whipping the egg whites. Any moisture or grease will inhibit the egg white's ability to aerate to the required volume.
STEP 2: Whisk the egg whites to a soft peak. This is the first step in making the meringue. Add the whites into a stand mixer bowl and whisk on medium-low speed until soft peaks form (Image 3).
You'll know when this happens because the egg whites will gradually turn white and start to look foamy and aerated.

STEP 3. Add the sugar gradually. Turn the mixer to low and then add 1 tablespoon of sugar at a time into the mixing bowl whipping well for approximately ten seconds before the next addition (Image 4).
Take your time over this part; it can take a good couple of minutes until all the sugar is added. Scrape down the sides of the bowl periodically, as the sugar granules can stick around the sides of the bowl. Once all the sugar is added, turn the beaters to high and whip for a further 5 minutes.

STEP 4. Add in lemon juice and cornflour and whip until glossy.
Add the lemon juice (or white vinegar) and the cornflour, then continue to whip for a further 5 minutes. The meringue should not be grainy and should be thick and shiny and hold its shape when ready (Image 5).
TIP: How to check if the sugar has fully dissolved
Rub a bit of the meringue between your index finger and thumb (Image 5). It should feel smooth. If it feels grainy, then continue to whip for another couple of minutes.
If the sugar doesn't dissolve properly, then you'll have seeping liquid come out of your Christmas Pavlova on the serving platter. Not ideal!

TIP: Secure the baking paper
It gets rather annoying when the baking paper slides all over the place.
Secure it by adding a small dollop of the meringue mixture to the underside of the four corners of the paper (Image 6). Stick the paper down, and this provides a grip for the paper not to slide. Easy!
STEP 5: Spoon meringue onto the tray and bake. Using a spoon, dollop meringue into the ring drawn onto the parchment paper (Image 7). You can dollop it into mounds like I have or make one cohesive ring. It's up to you!
Use an offset spatula or the back of the spoon to shape the meringue and to create an indentation in the centre (Image 8). This holds the cream later on.
Bake. Place the tray into the oven and turn down the temperature to 110C (230F) and bake the meringue wreath for 2 hours. Once the hour is up, turn off the oven but leave the meringues inside, leaving the door closed to cool fully (Image 9).
At 2 hours, the meringue is crisp on the outside and marshmallowy on the inside. If you prefer it to be chewy on the inside, bake for an extra 45-60 minutes at the same temperature.
TIP: Don't open the oven door during baking or cooling
No peeking by opening the oven door. This will let the hot air out and moisture into the oven, which is what we don't want!!
Make the Sweetened Whipped Cream

STEP 6. Make the sweetened whipped cream. Add the cream, powdered icing sugar and vanilla extract into a bowl and whip until firm peaks (Images 10 & 11). You can read more about making sweetened cream in my Creme Chantilly guide.

Assemble and Decorate the Meringue
STEP 8: Decorate your meringue wreath!
TIP: Prevent a soggy meringue
If the cream is sat on the meringue before serving, the cream can gradually soften the meringue. To prevent this from happening, we need to create a barrier between the cream and the meringue.
That's where melted chocolate comes into play. Gently brush melted chocolate over the top of the meringue and let it cool and harden (Image 11). Then top with cream. Et voila - no soggy meringue!
Dollop whipped cream into the indents of the meringue all the way around (Image 12), drizzle with a little raspberry coulis (Image 13), optional, and arrange the fruit over the top (Image 14). Now you have the perfect Holiday Christmas Pavlova!
TIP: Raspberry Coulis
Making raspberry coulis is totally optional. You can use store-bought or omit it entirely.
To make the coulis, heat 130g (1 cup) fresh or frozen raspberries along with 2 tablespoon fresh lemon juice and 2 tablespoon white sugar in a saucepan. Heat until the sugar has dissolved and simmer for 5 minutes.
Pass the mixture through a fine-mesh sieve and cool the coulis completely.
How To Make Mini Pavlovas
Turning the meringue wreath into mini pavlovas, or meringue nests as they are occasionally called, is super simple.

Draw circle guides: Instead of drawing a huge circle, find a small bowl and draw around that on the parchment paper. Having the pencil guidelines definitely helps get neater mounds of meringue.
Dollop & Bake. Follow the method of making the meringue. Once thick and glossy, spoon it into the drawn circles, heaping it and swirling it as you go. Create an indent for the cream. Use the white chocolate trick here too! Bake for 1 hour.
💡 Recipe Pro Tips Recap
- Use a dry, clean bowl to whip the meringue in.
- Initially, whip meringue on the medium rather than high speed. This helps create more stability in the meringue.
- Check oven temperature. Don't forget to turn the oven temperature down as soon as the meringue goes in.
- Don't open the oven door whilst pavlova bakes. Such a necessary step to ensure crisp meringue. A must for your perfect Christmas Pavlova.

📋 Recipe FAQs
The meringue is the baked egg whites and sugar. As soon as the whipped cream and fruits are decorated onto of the meringue, it's turned into a Pavlova!
As it takes such a long time to cook and cool, yes, it's best to make the meringue the day before. Or you can cook it in the evening and let the meringue cool overnight.
I wouldn't assemble the Pavlova the day before, though, as the meringue will turn soggy.
In Australia and New Zealand, yes, pavlova is often served on Christmas Day. Being in a hot climate, a light dessert is more favourable than a dense fruit cake.
I've taken this tradition even living in the UK. After a large roast lunch, the light meringue is ideal! Hoorah for the Christmas Pavlova!
Don't worry - the whipped cream will solve that problem! If the cracks can't be covered up, turn it into an Eton Mess. Break up the meringue, divide it into individual glasses and top it with cream, coulis and fruit. The flavour is identical, and you've made perfect individual portions!
❄️ Storage and Freezer Instructions
To store: Meringue is best stored 'undressed'. Once cooled completely, gently place the meringue into an airtight container and store it at room temperature for up to 5 days. Do not refrigerate it. The whipped cream can be refrigerated in an airtight container for up to four days.
To freeze: Meringue can be frozen but not your Christmas Pavlova fully assembled. Freeze meringue on the baking tray, and then once hard, store in a freezer-safe container or zip lock bag for up to 3 months. Thaw at room temperature, ensuring it does not come into contact with any moisture.
🎄 More Christmas Recipes


If you tried this Christmas Pavlova recipe or any other recipe on my website, please leave a 🌟 star rating and let me know how you go in the comments below. I love hearing from you!
This post was originally published in July 2019 but has been updated with new photos, new content and a revised recipe.
📖 Recipe

Christmas Pavlova Recipe
Equipment
- Baking Tray
Ingredients
Meringue
- 6 large egg whites, room temperature
- 300 g caster sugar (superfine)
- 1 teaspoon fresh lemon juice or white vinegar
- 1 teaspoon cornflour (corn starch)
Sweetened Whipped Cream
- 360 ml double cream (heavy cream)
- 30 g powdered icing sugar (confectioners’ sugar)
- 1 teaspoon vanilla extract
Decoration
- 100 g white chocolate (optional), melted
- 70 g fresh red currants
- 130 g fresh raspberries
- 100 g fresh figs, quartered
- raspberry coulis (optional)
Instructions
Make the Meringue
- Prep the oven and trays. Heat your oven to 140°C (280°F). Line a baking tray with parchment paper and trace a circle 30cm (12in) in diameter. Then draw an inner circle 10cm (4in) in diameter. Use bowls as guides if necessary. Turn the parchment paper over so that the pen/pencil line is underneath.
- Whisk the egg whites to a soft peak. In the bowl of a stand mixer fitted with the whisk attachment, whip your egg whites on medium-low speed for 3 minutes until they are soft peaks.
- Add the sugar gradually. Turn the mixer up to low speed, and whilst whisking, add the caster sugar one spoonful at a time. (In between each spoon, whisk for 10 seconds before adding the next spoonful). Once all the sugar is added, continue whisking at high speed for 5 more minutes.
- Add in lemon juice and cornflour and whip until glossy. Then add the lemon juice and cornflour and whisk for another 5 minutes. By now, the egg white mixture should be thick and glossy, and the sugar should be fully incorporated. If you rub a bit of mixture between your thumb and finger, there should be no grit as the sugar has fully blended; if there is, then continuing whipping for a couple more minutes.
- Spoon meringue onto the tray and bake. Spoon the meringue mixture onto your prepared tray between the two pre-drawn circles. Shape the meringue with the back of a spoon and create a small indent for the cream to sit into.Bake. Place the baking tray in the centre of the oven and immediately reduce the oven temperature to 110°C (230°F) and bake for 2 hours. Then turn the temperature off and leave it in the oven for a minimum of 2 hours (preferably overnight) to cool completely. Don't open the oven door!
Make the Sweetened Whipped Cream
- Whip the cream. Add the cream, powdered icing sugar and vanilla extract into a bowl and whip until firm peaks
Assemble and Decorate
- Brush on white chocolate (if using). With a pastry brush, very gently brush the melted chocolate over the top of the meringue and let it cool until hard.Decorate. Spoon the whipped cream into the indents of the meringue wreath all the way around. Drizzle with raspberry coulis if using, and decorate with redcurrants, raspberries and figs.
All recipes are developed and tested in Metric grams. I strongly recommend that you bake using digital scales for a more accurate result. I have provided a conversion to US customary in the recipe but please note that I haven’t tested using this method.


Marissa says
This was a great recipe! Thank you Emma 😊❤️
Emma says
Hi MArissa- thank you SO much for the feedback xx
Stephanie says
Such as tasty dessert that you can switch the fruit for your favourite options. It made a beautiful centrepiece at a Christmas party
Emma says
Thanks so much for the lovely comment Stephanie - your's looked beautiful on instagram- thanks for sharing the image!
Stephanie says
Such a tasty dessert which you can swap the fruits out for your favourite. Made a beautiful centrepiece at a Christmas party.
Almudena says
I saw this recipe on Instagram and immediately wanted to try it just because it looked stunning. I was then redirected to this beautiful website and I did the recipe this last Christmas. My family loved it!! It's as delicious as it looks ♥️
Emma says
Hi Almudena, Thank you so much for your feedback and I'm humbled to have been [art pf your special Christmas Day. xx
Gay says
This is the pavlova I make each and every Boxing Day, if it didn't appear I think we would have a riot. It looks stunning and tastes amazing - what's not to love? Thank you Emma.
Emma says
Your comment brought a smile to my face. Humbled to make it to your festive table every year 🙂
Julie says
Hi
I'm going to try this for Christmas Day. Stupid question - How to you make the paler coloured red currents please ? thanks
Emma says
Hi Julie- You pop the red currants in the freezer. When they are taken out of the freezer they get this beautiful frost around them. Emma
Sabrina says
Super excited to make this for Christmas in a few days. Question - how did you get the red currants to look frosted? Do you freeze them? Or coat them in sugar?
Thanks!
Emma says
Hi Sabrina- Yes- that's exactly it- freeze them first - then when you take them out, they develop that beautiful frost.
Monika Fotheringham says
Just made for Christmas
Your instructions made it so easy thankyou
Will definately make more
Emma says
Thank you so much for the great feedback Monika. So humbled to be a part of your Christmas 🙂
Maggie says
My beautiful sister sent me your pavlova and we both made it for Christmas dessert! It was a hit for both our families. I had to swap your fruit suggestions for what I could find but I think it still worked perfectly.
Emma says
Hi Maggie- That's fantastic news! That's the beauty of this pavlova- you can add any type of your favourite fruit!!
CarolAnn says
Can’t wait to try this. What is the green decoration? Sprigs of rosemary?
Emma says
Hi CaralAnn- yes it's rosemary- purely for decoration - but looks so pretty.
Lydia says
Looks delicious! Is the oven temperature fan forced or without?
Emma says
Without fan forced.
Thuy says
This was such a showstopper and very delicious! Is there a way to cut the sugar to make it less sweet or is the amount of sugar required for the structure of the meringue?
Emma says
You could try cutting the sugar by 25%. I've never tried it, so can't guarantee results - but hopefully it doesnt affect stability and structure too much