


A delicious recipe for Chocolate Swiss Roll Cake combining soft, fluffy sponge cake rolled with cream cheese frosting and covered in a rich chocolate ganache. It is an impressive yet surprisingly simple recipe to make that's fit for any occasion.

Your chocolate cravings will definitely be satisfied with this beauty of a cake. Not too rich and sweet, the chocolate in this dessert balances the cream cheese frosting filling perfectly. Whilst an optional addition, the blackberries provide the perfect fruity topping to the Swiss Roll.
If you love the combination of chocolate and blackberries, you’ll love my Chocolate Sour Cream Cake, or if you’d prefer to indulge in the richness of unadulterated chocolate, then my Italian Dark Chocolate Torte will blow you away.
In this post, I guide you with step-by-step photos and detailed a description so that you can set aside your fears of creating a Swiss roll and make it your next weekend baking project. Turn yourself into the next Mary Berry or Nigella by creating what looks like a super complicated but actually surprisingly simple dessert.
Jump to:

Whether you call this a Swiss Roll, Roulade, Cake Roll, or roll-up dessert, I’m here to say that you can master this easy Chocolate Swiss Roll Recipe too. It’s a winner, and I want more than anything for you to enjoy it too.
🌟 Why You'll Love This Recipe
- The perfect balance of flavours. The chocolate isn't too rich, and the cream cheese frosting isn't too sweet—the perfect combination in one bite.
- Make ahead. This is a great option for an easy dessert that can be made ahead of time.
- It feeds a crowd! Depending on how thinly you slice the roll, you can get 10 to 12 slices out of this one roll. Perfect for entertaining
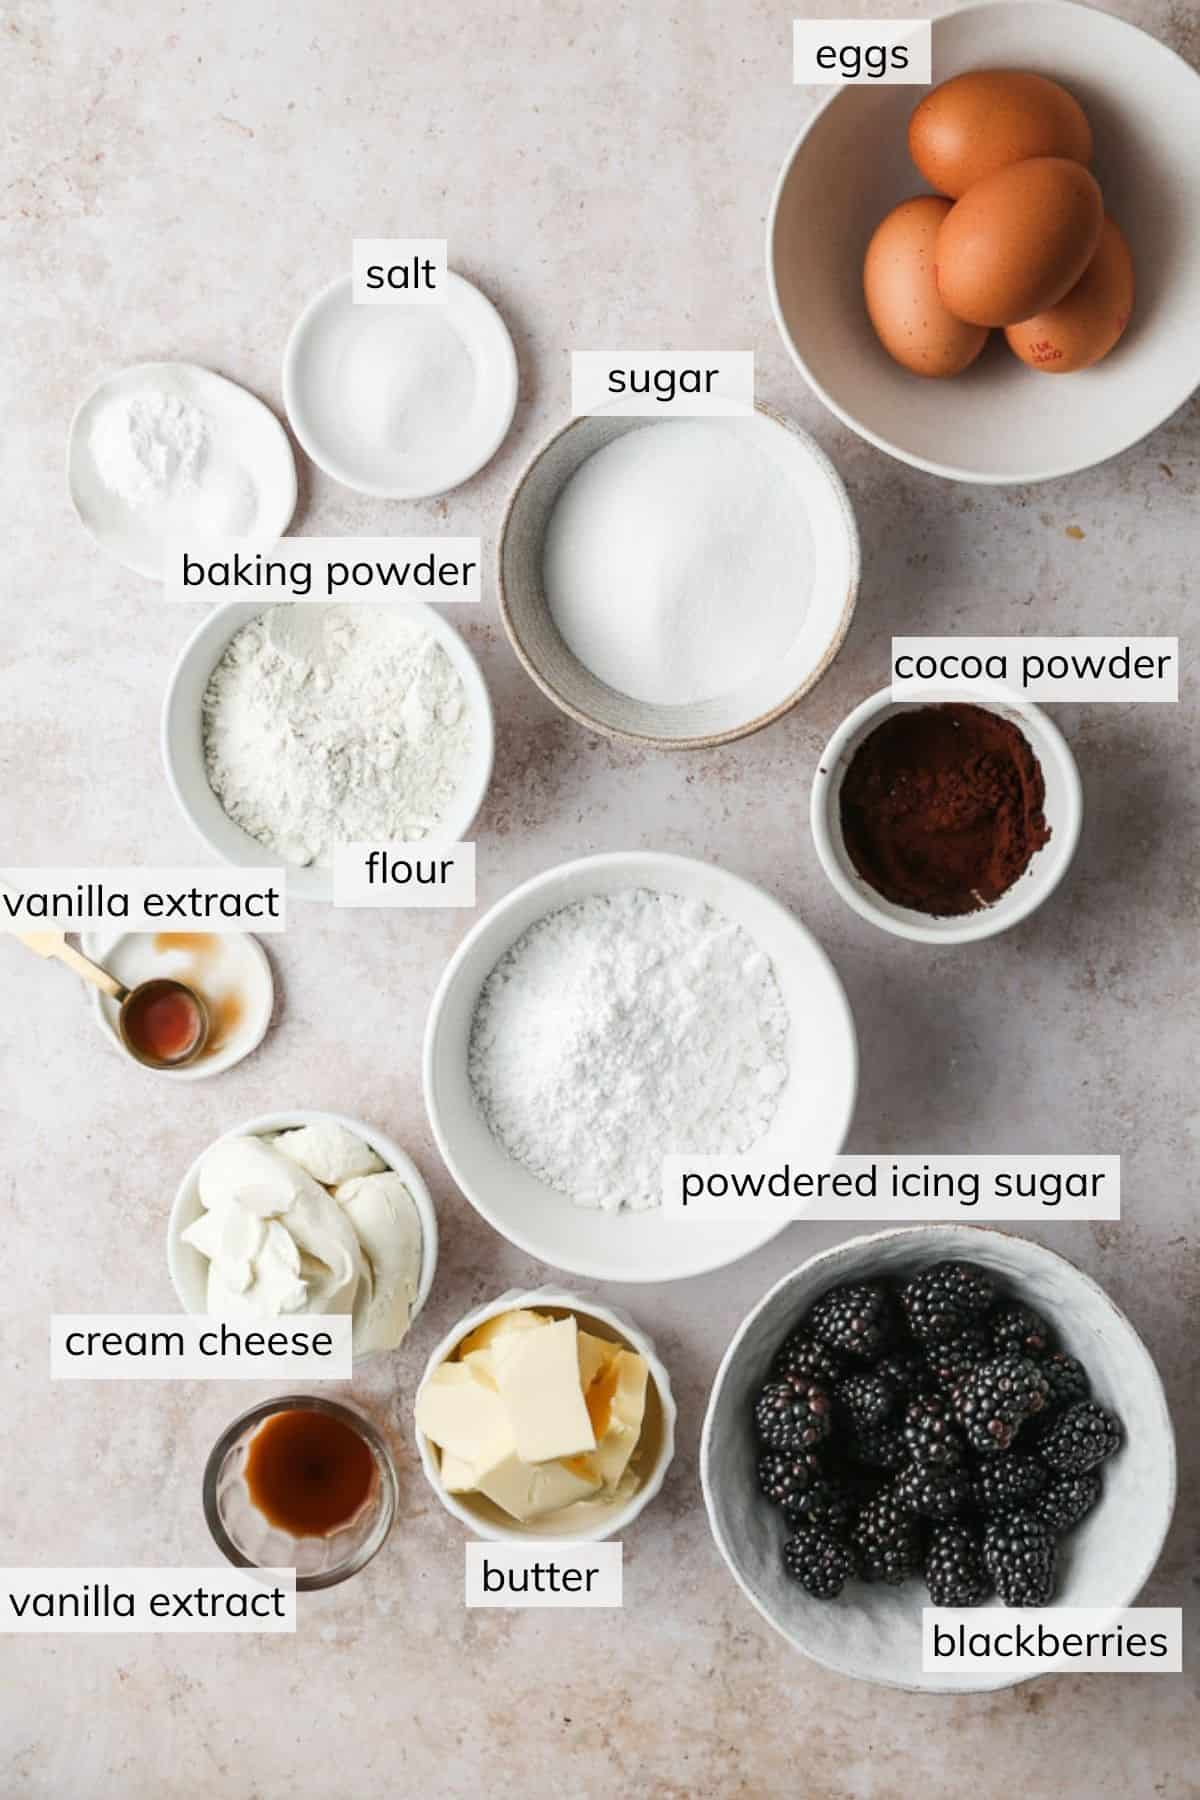
🧾 Ingredients Needed
Whilst the ingredients are basic pantry and fridge staples, I've made notes regarding some below.
For the Chocolate Swiss Roll Sponge Cake
- Eggs - provide structure and, more importantly, moisture to the sponge. Make sure to whip them for the required time.
- Sugar - to sweeten the cake roll.
- Vanilla extract - to add extra flavour.
- Plain flour - To provide structure. Weigh the flour so that you don’t add too much, which will cause a dry sponge that will crack. Substitute with self-raising flour, but omit the baking powder if doing so.
- Cocoa powder - use Dutch or natural cocoa powder in this recipe.
- Baking powder - adds a little additional lift to the sponge.
- Salt - balances out the sweetness.
For the Cream Cheese Frosting
- Cream cheese - I recommend Philadelphia cream cheese. If using cream cheese from a tub (rather than brick/block form), pat the cream cheese with a paper towel to remove some moisture. (Refer to notes in How to make cream cheese frosting)
- Unsalted butter - adds taste and structure to the frosting. Beat it for long enough to create air.
- Vanilla extract - adds flavour.
- Powdered icing sugar - sift into the frosting to ensure a smooth consistency
For the Chocolate Ganache
- Dark chocolate - I recommend 70% chocolate for the perfect balance.
- Double cream - this ganache is thick, so add 60ml (¼ cup) more cream for a more pourable consistency.
- Butter - the magic ingredient to give your ganache shine, even when the chocolate sets. Salted or unsalted will do.
📖 Variations
There are many different variations to a Swiss Roll, and I can’t wait to share more here on the blog. Other types I’m hoping to make in the future are:
- Raspberry Swiss Roll: Raspberry Conserve and creme fraîche filled lemon sponge roll, perfect for Springtime.
- Simple Vanilla Swiss Roll: Filled with sweetened whipped cream, this is refined simplicity at its best!
- Espresso Swiss Roll: Rich chocolate sponge filled with an espresso buttercream that would make a perfect base for a Christmas time yule log.
- Cookies n’ Cream Swiss Roll: For the ultimate treat for the kiddies, fill your chocolate Swiss Roll with whipped cream and crushed Oreos.
- Strawberry Swiss Roll: Vanilla sponge roll filled with roasted strawberry buttercream and decorated with fresh strawberries and mint leaves.
👩🏻🍳 How to Make
*Be sure to see the recipe card below for the full ingredients list & instructions!*
There are three steps in making this Chocolate Swiss Roll.
- Firstly, you have to make the sponge and then once it’s baked roll it up and let it cool.
- Secondly, while the sponge is cooling, it’s time to make the cream cheese filling; unroll the sponge, slather on the filling and then re-roll the sponge for it to set in the roll.
- Lastly, the roll needs to be decorated and today we’re doing this by making a luscious chocolate ganache and coating the Swiss Roll in it.
Chocolate Cake Sponge
STEP 1. Prepare your pan and preheat the oven to 180C (350F). Grease the base and sides of your baking pan with oil or butter and line with parchment paper. The paper should overhang the side so that it’s easier to remove the sponge from the tray later. Grease the parchment paper as I find this will help with peeling off the paper before rolling the sponge.

STEP 2. Whip egg whites. In a separate clean and dry bowl, whisk the egg whites until soft peaks form (Images 1 & 2).

STEP 3. Whip the egg yolks & sugar. In the bowl of a stand mixer fitted with a whisk attachment, add egg yolks, sugar and vanilla extract and whip for a good 4 minutes until pale and thick (Images 3 & 4). Set a timer! It always feels like quite a long time, but you need to whisk for long enough.
TIP: When you lift the whisk up you should be able to see the trail of mixture for a couple of seconds.

STEP 4. Sift in dry ingredients and add the egg whites. This step is done in 2 parts.
- Into a separate bowl, sift in the flour, cocoa powder, baking powder and salt and whisk together. Add half the cocoa flour mixture directly to the egg yolk mixture in the bowl. Add in half the egg whites (Image 5). Using a rubber spatula, fold the mixture until the flour and egg whites are just incorporated (Image 6).
- Then, add the remaining cocoa flour mixture and the remaining egg whites (Image 7). Again, fold through until just a few flour streaks remain (Image 8). This will ensure that you don't overmix. Fold them in with a light touch to maintain all the trapped air. This is one of the reasons why the sponge is so light and airy.

STEP 5. Bake and cool. Pour the batter into the prepared pan (Image 9) and move the batter to the edges with an offset spatula. Smooth until level (Image 10). Tap the pan firmly on the countertop to release any air bubbles.
Bake for 10 to 12 minutes until the centre springs back, the sponge has started to shrink away from the sides, and the sponge is golden brown and dry to touch.
Set aside until the sponge is warm-not hot. Once the cake is baked, remove the pan from the oven and set the tray on a wire rack for ten minutes until the sponge is warm but not hot. This is an important step - don't skip it or go over the ten minutes.

STEP 6. Prepare your tea towel. Whilst the sponge is sitting on the wire rack, sprinkle the cocoa powder onto a tea towel or sheet of parchment paper laid flat on the work surface (Image 11). The cocoa powder must cover a slightly larger surface area than the pan the sponge is baking in.
Invert the sponge onto the tea towel. Once the sponge has baked, please remove it from the oven and invert it immediately onto the cocoa powder on the prepared tea towel (Image 12).
TIP: I prefer to use a tea towel as I find the sponge stays soft when it comes to unrolling it later on. Don’t worry; the cocoa powder does come out! Give the tea towel a quick rinse when you've finished with it and then put it straight into the washing machine.

STEP 7. Peel off the parchment paper. Use your fingertips to gently peel the parchment paper away from the sponge (Image 13).
Roll the sponge up. Using your hands and starting from the short end of the sponge rectangle, gently but firmly roll the warm sponge into the tea towel (Image 14). Set the cake roll aside with its seam side down to cool completely.
Cream Cheese Frosting
Whilst the cake roll is cooling; this is the perfect opportunity to make your cream cheese frosting.
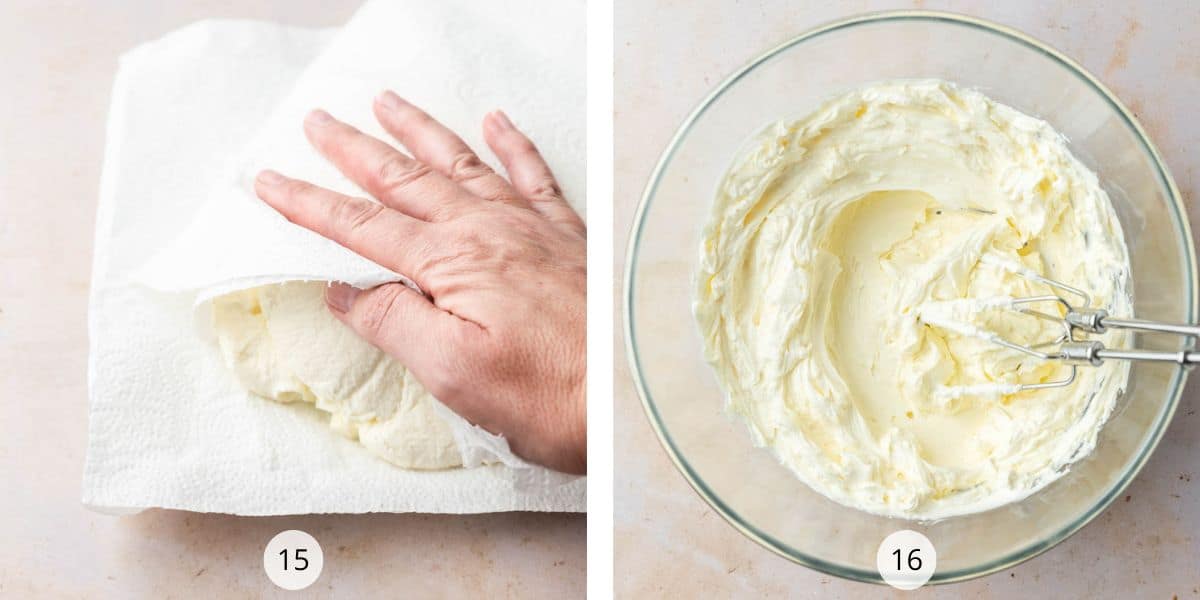
TIP: British Cream Cheese vs American Cream Cheese. What’s the difference? The cream cheese sold in tub form in the UK has a much higher fat content than the brick/block equivalent. This higher fat equals more moisture in the cream cheese and this results in soupy frosting. That's a no-no! So we have to try and remove some of this moisture by patting the cream cheese with a paper towel.
STEP 8. If using cream cheese from a tub, then place the cream cheese on two pieces of paper towel, fold the paper over until the cream cheese is fully covered, and pat dry (Image 15). Repeat with another two pieces of paper towel. Philadelphia that comes in brick/block does not need to go through this process.
STEP 9. Whip the butter and vanilla extract. Beat the butter and vanilla extract for 4 minutes until pale and fluffy.
Sift in the powdered icing sugar and beat again for another 2 minutes, then add the cream cheese and beat until combined (Image 16). Refrigerate for half an hour.

STEP 10. Unroll sponge. Gently unroll the sponge from the tea towel or baking paper (Image 17).
Fill with frosting. Dollop cream cheese frosting onto the sponge and, using an offset spatula, smooth out evenly over the sponge, leaving a 2 cm (1-inch) gap all around the edge of the sponge (Image 18).
Roll time! Gently roll the sponge up again, trying not to squeeze out the filling too much (Image 19).
Wrap and refrigerate. Wrap the roll in a piece of parchment paper and then tightly in plastic wrap for it to hold its shape (Image 20). Refrigerate for 1-2 hours for the frosting to set.
Chocolate Ganache Coating
Let me show you how to cover the Swiss Roll in chocolate ganache. Mine is a thick ganache that coats the roll thickly, but if you prefer a thinner coating, add more cream to the ganache.
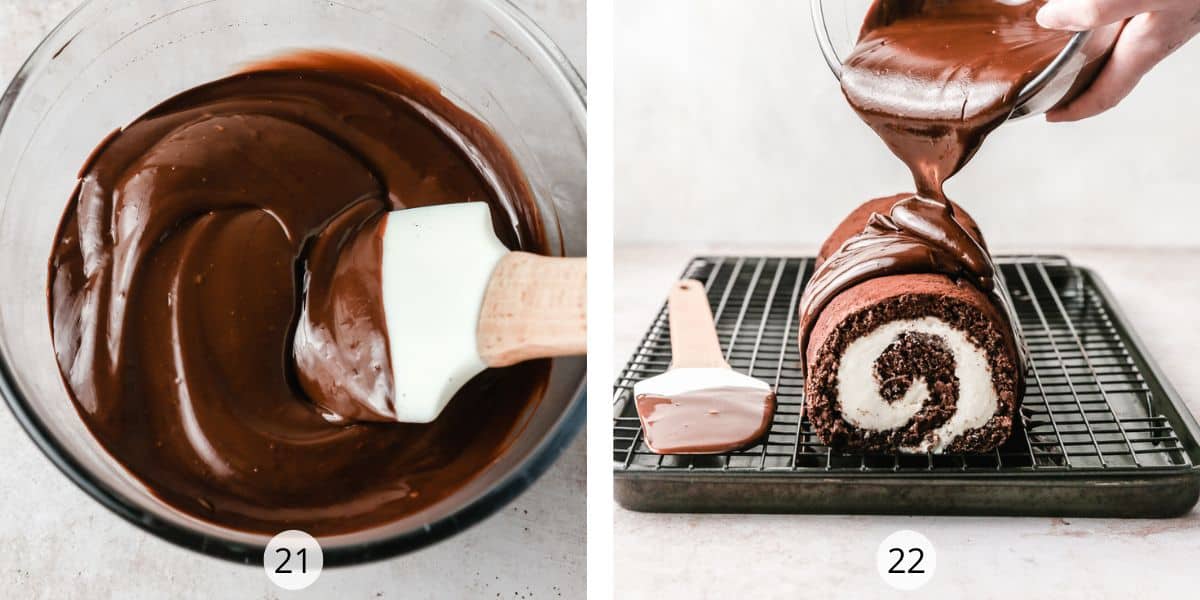
STEP 11. Make the ganache. In a small saucepan, gently heat cream until warm and simmering around the edges. Place chocolate and butter into a bowl and pour the cream over the top. Let it stand for 5 minutes, and then stir until the chocolate is completely smooth and the butter has melted (Image 21).
STEP 12. Cover Swiss Roll. Unwrap the rolled sponge from the plastic wrap and parchment paper and place it on a wire rack over a baking tray. Pour the ganache over the Swiss roll and use an offset spatula to help spread the chocolate (Image 22).
Either leave the Chocolate Swiss Roll plain covered only in chocolate ganache or decorate with blackberries for an extra finishing touch.
TIP: How to slice the roll neatly
Before serving, slice the two ends off to neaten up the Swiss roll. There are two ways to do this effectively.
- With a knife: Heat the knife's blade by running it under hot water, wiping it dry, and slicing through. Heat and wipe the blade for every cut.
- With dental floss: Cut a long piece of dental floss, and holding each end, manoeuvre it under the Swiss roll to where you want the cut. Bring the two ends up around the roll to crossover on the top and pull together to slice through the cake roll.

💭 Recipe Pro Tips
- Don’t overbake the sponge. If you do, you’ll most likely develop cracks.
- Don't let the cake cool completely before rolling. Even though I specify for the cake to rest in the pan for ten minutes, it still needs to be warm for the sponge to be pliable enough to roll. Cold, and the sponge will crack.
- The frosting has to be thick enough. Ensure the cream cheese frosting has the correct consistency before spooning it onto the sponge cake and rolling. You could have a soupy mess otherwise. (Read more about this in my FAQ’s)
- Refrigerate the roll before topping with the ganache. This allows the cream cheese frosting to be set in place and keeps the roll together.
📋 Recipe FAQs
A Swiss Roll is typically made up of a thin sponge filled with jam, whipped cream or buttercream and rolled into a spherical shape. On the other hand, a roulade is sweet or savoury and often involves rolling meat or pastry. Both are traditionally served as slices.
Absolutely! Remove the sponge from the freezer after it has baked, invert the sponge onto a tea towel and remove the parchment paper. Slice the sponge into 4 or 6 rectangles. Roll each rectangle up in cocoa-dusted baking paper and set it aside to cool on its seams. Fill each of the min rolls with filling and continue with the recipe.
You can buy specific Swiss Roll pans or jelly roll pans if you like (as seen here in the UK and the US), but as long as your baking pan is approximately 25x38cm (10x15-inch) with a 2.5cm (1-inch) lip all around, you will do great!
I have tested this recipe in a 45x32cm (17.75x12.75-inch) USA half-sheet baking pan. It worked perfectly. Make sure to smooth the batter evenly prior to baking. The finished roll will have a thinner sponge, but because of the bigger pan size- there will be more 'roll' visible when cut.
This Chocolate Swiss Roll Cake actually works really well as a make-ahead dessert. Fill the sponge, roll and wrap in plastic wrap and refrigerate overnight. Make the ganache and cover the roll the same day as serving. The Swiss roll can then be stored in an airtight container in the refrigerator for up to 5 days.
💡Troubleshooting
Why is my Chocolate Swiss Roll rubbery?
This boils down to how you mix your chocolate cake batter. If you over-mix the batter, then the flour causes gluten strands that cause the batter to tighten and toughen when baking and resulting in a rubbery sponge. Fold the dry ingredients with a light hand and mix just until the flour is combined.
What happens if the sponge cracks?
If it has cracked slightly, don’t worry; keep going. Fill and roll as per my instructions, and the chocolate ganache will hide those cracks. It will still taste gorgeous.
❄️ Storage and Freezer Instructions
To store: Chocolate Swiss Roll Cake can be stored in an airtight container in the refrigerator for up to 5 days.
To freeze: Unfilled, a rolled sponge can be wrapped in plastic wrap and then foil and frozen for up to 2 months. Thaw in the refrigerator overnight and allow to come to room temperature before filling and continuing with the recipe instructions.
🍫 More Chocolate Recipes


If you tried this Chocolate Swiss Roll Recipe or any other recipe on my website, please leave a 🌟 star rating and let me know how you go in the 📝 comments below. I love hearing from you!
This blog post was originally published in March 2021. The recipe has since been updated.
📖 Recipe

Chocolate Swiss Roll Recipe
Ingredients
Chocolate Sponge
- 4 large eggs, yolks and whites separated and at room temperature.
- 100 g caster sugar (super-fine)
- 1 teaspoon vanilla extract
- 65 g plain flour (all-purpose)
- 35 g cocoa powder, plus extra for dusting the tea towel
- 1 teaspoon baking powder
- ¼ teaspoon fine salt
Cream Cheese Frosting
- 220 g Philadelphia cream cheese, room temperature
- 100 g unsalted butter, softened
- 1 teaspoon vanilla extract
- 200 g powdered icing sugar (confectioners’ sugar)
Chocolate Ganache
- 200 g dark chocolate 70% , finely chopped
- 240 ml double cream (heavy cream)
- 15 g unsalted butter
To Serve
- blackberries to decorate, optional
Instructions
Chocolate Sponge
- Preheat your oven to 180°C (350°F)Prepare your pan. Grease with butter or spray with non-stick spray the base and sides of a 25x38cm (10x15-inch) baking pan /swiss roll pan/jelly roll pan. Line the pan with parchment paper, ensuring the paper overhangs the pan's sides. This will help you later when trying to remove the sponge from the tin. Grease the parchment paper with butter, as this will help with peeling the paper off once the sponge has baked.
- Whisk egg whites. Using handheld electric beaters or in the bowl of a stand mixer fitted with the whisk attachment, whisk the egg whites on medium to high speed until soft peaks form.
- Whip the egg yolks and sugar. In a separate bowl, whip the egg yolks, sugar and vanilla extract on medium-high for 5 minutes until the mixture is light and creamy. When lifting out the whisk, you want to see trails of the mixture on the surface of the batter for a few seconds.
- Sift dry ingredients. Into a separate bowl, sift in the flour, cocoa powder, baking powder and salt and whisk together.Add dry ingredients and add egg whites in two parts. Add half the cocoa flour mixture directly to the egg yolk mixture in the bowl. Add in half the egg whites. Using a rubber spatula, fold the mixture until the flour and egg whites are just incorporated. Then, add the remaining cocoa flour mixture and the remaining egg whites. Again, fold through until just a few flour streaks remain. This will ensure that you don't overmix. Fold them in with a light touch to maintain all the trapped air. This is one of the reasons why the sponge is so light and airy.
- Pour the batter into the prepared pan and shake/wiggle the pan to help guide the batter into the pan's corners. Use an offset spatula if necessary to help smooth out the batter.Bake in the oven for 10-12 minutes until a toothpick inserted into the centre comes out clean and springs back when pressed lightly.Cool: Remove the baking pan from the oven and set it on a wire rack to cool for ten minutes until the sponge is warm and not steaming hot. It's important not to miss out on this step.
- Prepare your tea towel. Whilst the sponge is baking, lay a tea towel or piece of parchment paper on your work surface and dust generously with cocoa powder. (Alternatively, sprinkle with caster sugar or dust with powdered icing sugar).
- Invert the sponge onto the tea towel. After 10 minutes, invert the sponge onto the tea towel whilst it's still hot. Peel off the parchment paper. Gently peel off the parchment paper on the bottom of the sponge. Roll sponge up. Starting from the sponge's short end, using your hands, roll the sponge up gently but firmly until it is totally rolled into the tea towel (or parchment paper). Set the roll aside with its seam side down to cool completely.
Cream Cheese Frosting
- Whilst the sponge roll is cooling, make the cream cheese frosting. If you are using Cream Cheese from a tub, place the cream cheese into the centre of two pieces of paper towel. Fold the paper towel around the cream cheese and pat it firmly to remove some of the moisture. Repeat this on another two pieces of paper towel. Set to one side. (There is no need to do this step if using Philadelphia in brick/block form).
- Whip the butter and vanilla extract. In the bowl of a stand mixer fitted with the paddle attachment, add the butter and vanilla extract and beat on high for 4 minutes until pale and creamy. Add in the powdered icing sugar and beat until mixed in. Continue to beat for another two minutes. Add in the cream cheese and beat on medium speed until mixed through. The frosting should be smooth but firm enough to hold its shape. Refrigerate for 20-30 minutes.
- Unroll, fill and re-roll. Gently unroll the sponge once it has cooled. Spread the cream cheese filling evenly over the sponge's surface, leaving a 2cm (1-inch) gap around the edge. Re-roll the sponge up again and wrap it in parchment paper and then in plastic wrap for the roll to hold its shape. Refrigerate for 1-2 hours for the filling to firm up.
Chocolate Ganache
- Before serving, make the chocolate ganache. Place the chopped chocolate and butter into a medium bowl. In a small saucepan, heat the cream gently on low heat until steaming and simmering around the edges- but don't boil. Pour the cream over the chocolate into the bowl and let it sit for a couple of minutes. Then whisk continuously until the chocolate is smooth and the butter has melted.
- Cover swiss roll. Place the swiss roll onto a wire rack set on a baking tray. Slowly pour the ganache to coat the roll. Use an offset spatular to smooth the chocolate all over. Decorate with blackberries if desired and let the chocolate set for 20 minutes before slicing ends to neaten up the roll before serving. See tips below for slicing.
All recipes are developed and tested in Metric grams. I strongly recommend that you bake using digital scales for a more accurate result. I have provided a conversion to US customary in the recipe but please note that I haven’t tested using this method.


Coco says
Emma, this looks so good! Thank you for all the in-depth instructions, I think I’ll give the recipe a try for Easter and maybe just use raspberries, as those are my favourite 🙂
Emma says
Hi Coco - I hope that with the guide, you'll be able to master your very own roll. Raspberries on top and even throughout the cream cheese frosting would be amazing!
Debs says
Absolutely amazing recipe and such a helpful informative post! Gorgeous photos too!
Emma says
Aw thanks so much Deb - I enjoyed putting it all together x
ADS says
I have never made a swiss roll cake before but I have to say your thorough directions were extremely helpful in walking me through the process and getting perfect results on my first try.
I plan on making more of your recipes. This one was surely a hit in our house.
Thanks for creating such helpful and informative recipes for beginner bakers like myself. Keep them coming.
Cheers,
Ice
Emma says
Thanks so much for your incredible comments Ice. I am so glad that you found my post useful and the step-by-step process will help you become confident at making swiss roll's in the future. That's precisely why I pack in so much info. All the best. Em
Rebecca Rolingson says
Followed this recipe and worked a treat. A definite family favorite from now on. Decorated with edible flowers and it looked a showstopper on the table.
I did find that the volume of filling could be cut back as could the ganache, as I seemed to waste quite a bit.
Great recipe, really easy to follow and good detail for those of us that are not regular bakers. Thank you
Jayne says
Just made this for the 5th time and realised I hadn't left a review. I am a new baker been baking for about 8 months and got up the courage to try this about 4 months ago. I was so nervous but your photos and instructions were so good that it worked. My pan was smaller than stated so the swiss roll was slightly thicker but even so there was only 1 tiny crack when I unrolled and filled it. I now make it regularly, in the correct size pan, it is light as a feather and tastes great. I generally use raspberry jam and fresh cream for the filling and honestly everyone loves it. I usually worry about fridge space but this never lasts more than 24 hours. Thank you for making it so easy for somelike me.
Emma says
Hi Jayne- what a lovely comment to receive- made my day! Thank you!!